Device Scout Discovery Utility
The Device Scout Discovery Utility is an application installed with the Device Scout that allows you to perform any of the following tasks:
- Manually initiate a device discovery - Typically, the Device Scout picks up the new host addresses from the Pharos Cloud server and discover them within 24 hours, but you can use the Device Scout Discovery Utility to initiate device discovery manually.
- Configure SNMPv3 settings - To discover SNMPv3 network print devices, you will need to configure SNMPv3 settings using the Device Discovery tool. SNMPv3 configuration is not yet available on the web portal.
- Test scanning settings - The Device Discovery is a useful tool for testing scanning settings and inspecting the data collected from devices. Things that you may want to test using this utility:
- Scanning a new IP range
- New device types
- Investigating a specific device
- Firewall and/or network changes to ensure you are not blocking SNMP traffic.
Note: If you do not want device information and configuration settings to be pushed through to the Pharos Cloud server, you will need to turn off the following settings: Auto Upload Scan Results and Auto Upload Configuration.
Launching the Device Discovery Utility
From the Device Scout server, navigate to Programs > Pharos > Pharos Device Scout.
Click the Modify button to configure scanning and/or SNMPv3.
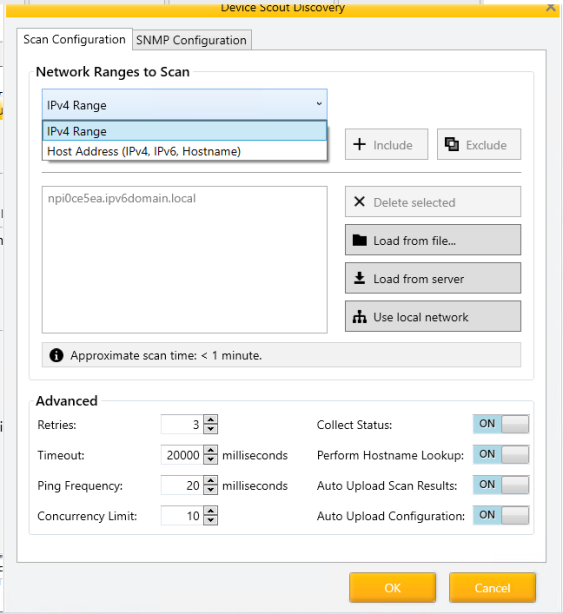
The Scan Configuration Tab
On the Scan Configuration tab, you can configure the host addresses of the devices you want to scan. Communication settings specific to the discovery process can also be configured here.
Manual entry of a single IP Address or Hostname
To manually enter a single IP address, follow these steps:
- In the Scan Configuration tab, select Host Address (IPv4, IPv6, Hostname) from the drop-down menu.
- Enter the single IP address or hostname in the first text field.
- Click the Add button. The host address will now be listed in the text box below.
- Click OK to save the changes.
Manual entry of an IPv4 Address Range
- In the Scan Configuration tab, select IPv4 Range from the drop-down menu.
- Enter the starting IP address in the first text field.
- Enter the ending IP address in the second text field.
- Click Include to include the specified IP address range.
- Optionally, click Exclude to exclude the IP address range if needed.
- Click OK to save the settings.
Importing host addresses from a file
You can also import host addresses from a simple text file. The import file requires each device entry to be on a separate line, and it can be represented by a hostname, IPv4 address, or IPv6 address. The list can include any combination of these network information for the devices.
Below is an example of a file showing an included IP scan range, an included IP Address, and an excluded IP scan range.

To import hostnames from a text file:
- Select Host Address (IPv4, IPv6, Hostname) from the drop-down menu.
- Click the Load from file button, browse and select the file you want to import. The printer host addresses defined in the text file will appear in the text box.
- Click OK to complete the process.
Delete a host address
To delete host address, select the host address you want to delete and then click the Delete Selected button.
Load from server
Selecting the Load from server option retrieves the host addresses specified in the Pharos Cloud server ( screen). This method synchronizes host addresses from the server. For example, you are adding new host addresses in the Discovery utility, but have no intention of saving these host addresses, clicking the Load from server restores previous host addresses.
Use Local Network
When you select the Use local network option, the Device Scout will scan the local subnet only based on the IP address and subnet mask of the server on which the Device Scout is running.
Advanced
On the Advanced tab, you can configure special case settings. Unless specifically directed, the settings on the Advanced tab should remain at their defaults. The following table summarizes each setting.
Note: Most of the following settings also exist in the Web UI ( ). Changing these settings in the Device Discovery Utility will override the value set on the Web UI.
| Setting | Description | Default |
|---|---|---|
| Timeout |
Is the length of time to wait for a response from a device when scanning addresses or communicating directly with a device. Note: This setting overrides the Timeout value set on the General tab of the Web UI. Timeouts will be more common when scanning a range of addresses and altering this setting can impact network load. |
2000 milliseconds |
| Retries |
This setting refers to the total number of attempts to discover a device at an address or to collect a single piece of information from a device. Note: This setting overrides the Retries value set on the General tab of the Web UI. Timeouts will be more common when scanning a range of addresses and altering this setting can impact network load. |
The default value is 3 retries. |
| Ping Frequency |
Is the time between retries. The default value is 20 milliseconds. Note: This setting overrides the Ping Frequency value set on the General tab of the Web UI. |
20 milliseconds |
| Perform Hostname Lookup |
Enable/Disable hostname lookup. On some networks, the hostname lookup for a device address can be invalid or meaningless, especially those using static IP addresses for devices. The default value of the Perform Hostname Lookup setting on the Device Scout has been changed to OFF (disabled). Previously, this setting was enabled by default, which posed issues for sites without a reliable DNS infrastructure. If you have reliable DNS information for your devices, you can choose to enable this setting. Note: This update exclusively applies to newly created Device Scouts and does not impact existing Device Scout installations. Note: This setting overrides the Perform Hostname Lookup value set on the Advanced tab of the web console. |
OFF |
| Concurrency Limit |
The Concurrency Limit controls how many devices can be communicated with at the same time. Increasing this setting can result in quicker scan times but at the cost of higher network load. Note: This setting overrides the Concurrency Limit value set on the Advanced tab of the web console. |
|
| Collect Status | Collect device status and alert information at the designated frequency. | Collect every 2 hours |
| Auto Upload Scan Results | Automatically upload devices to the Pharos Cloud server after scan. | ON |
| Auto Upload Configuration | Automatically upload configuration settings to the Pharos Cloud server after clicking OK. | ON |
The SNMP Configuration Tab
The Device Scout uses the Simple Network Management Protocol (SNMP) to discover and retrieve device information of network print devices within your organization. It supports the following versions: SNMPv1, v2 and v3. Support for v3 provides additional security for querying devices using SNMP by providing authentication, encryption, and access control.
The SNMP Configuration tab of the Device Discovery Utility allows you to define the SNMP settings used to communicate with devices via SNMP to discover devices. You can create, view, modify, delete, and change the priority of an SNMP configuration on this screen.
Note: While SNMP Communities are used per Device Scout, SNMPv3 configurations are shared by all the Device Scouts in your organization.
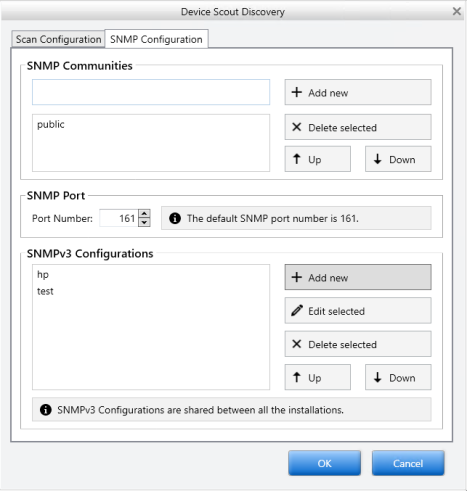
Adding SNMP Communities
In SNMPv1/v2, security is implemented through the use of communities. Pharos Cloud includes a default v1 SNMP configuration called public, which uses the default SNMP Community string “public”.
To add a new SNMP Community:
- In the text field under SNMP Communities, enter the community name that matches the SNMP Community string configured in your devices.
- Click Add New.
- Update SNMP port if required. Default port is 161. The firewall must be configured to allow access through this port.
- Click OK. The settings are pushed to the Pharos Cloud server (if Auto Upload Configuration is ON).
Adding new SNMP V3 Configuration
- Click Add New.
- Enter the SNMP v3 details of the devices.
- Title – Enter a name to identify the SNMPv3 configuration.
- Username – Specify the username of the device.
- Context Name – If configured for a device, enter the context name. This string is case-sensitive.
- Authentication – Select the authentication protocol and enter the password associated with the Authentication protocol. Choose from the following options:
- None
- MD5
- SHA1
Note: MD5 is not compatible with FIPS (Federal Information Processing Standards). If you have FIPS enabled and use MD5 as your authentication protocol for a device, you will get the error "Scan ended with error: This implementation is not part of the Windows Platform FIPS validated cryptographic algorithms".
- Privacy Protocol – Select the privacy protocol and enter the password associated with the privacy protocol. Options to choose from are
- None
- DES
- AES
Note: Make sure that all fields exactly match the SNMP v3 settings configured in your network print devices otherwise, the devices may not be discovered.
Note: The Context Name field is required if it is configured for the devices.
- Click OK to save changes.
How does the Device Scout determine which SNMP configuration to use
If there are multiple SNMP configurations defined in the Device Discovery tool, the order in which they are listed in the SNMP Configuration screen determines which configuration has precedence over other configurations. If the configuration with the highest priority fails, then the succeeding configurations are tried in order until one succeeds or the SNMP query fails. For example, on performing device discovery, it starts with the SNMP Community strings as they appear in the SNMP configuration screen and then goes through the SNMPv3 list one by one.
The first matching SNMP v1 configuration that is encountered will be the one that is associated with a device. If no match is found, no information is collected for that particular device. Once a matching configuration is found for a device, the association is stored and our tool uses the last known SNMP configuration. This prevents us from cycling through all possible options each time we communicate with the device.
Use the Up or Down buttons to change the priority of an SNMP Configuration.
Scanning the Network
When you click Scan Now, the tool returns a list of all discovered devices and submits it to the Pharos Cloud server right away. If you do not want discovered devices to be sent to Pharos Cloud automatically, you can turn off the Auto Upload options (Scan Configuration > Advanced).