Configuring Data Privacy
Data Privacy Configuration Tab
You can access the Data Privacy under the Profile tab in the web console. Using the Data Privacy tab, an administrator can do the following:
- View regions
- Change the Default region
- Enable one or more regions to make available to users
- Change the information collection setting per region (If the default values are not suitable)
- Viewing Print Job Information Collection Settings for a region
Changing the Default Region
By default, documents are stored in the US West Oregon region unless a different Default Region is specified.
Follow these steps to change the Default Region for your organization.
1. Navigate to the Profile > Data Privacy tab.
2. Select the region that you want to set as default.
3. Click the Configure button.
![]()
4. Move Available to Users slider to the “ON” position.
5. Move the Default Region slider by moving the toggle switch to the ON position.
Change the information collection setting if required. See Changing the Information Collection Setting for a region topic below for instructions.
6. Save the changes.
![]()
Changing the Information Collection Setting for a Region
A region comes with a default information collection setting, which defines whether to collect, hide or not collect print user information. You can configure Print Analytics to stop collecting or hide certain fields to meet specific organizational requirements.
1. Navigate to the Profile > Data Privacy tab.
2. Select the region.
3. Click the Configure button.
4. In the Collected Print Job Information drop-down list, select Custom.
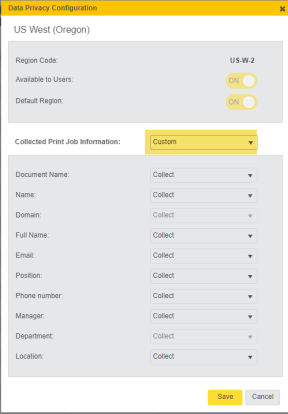
5. Change the value for the desired fields. The options are:
- Collect – The selected field will be collected and will be available in Pharos Cloud.
- Do Not Collect – The selected field will not be requested from the directory service and it will not be available in Print Analytics.
- Collect and One Way Hash - The Print Scout will collect that data, but it will be obfuscated in all Pharos Cloud views.
6. Save the changes.
The available fields and associated collection settings are described in the following table:
| Field Name | Description | Collection Options |
|---|---|---|
| Document Name | The name of the document being output by the print user. |
|
| Name |
The network identifier for the print user. Setting the Name field to "Do Not Collect" provides organizations the flexibility to anonymize print user information when necessary to reduce the risk of exposing sensitive personal data. This feature is suitable for sites where associating print transactions with specific users is not required. When set to "Do Not Collect", Pharos Cloud will not collect a user's name and other associated user information. In reports, the user data will be displayed as “Unknown”. Note: When the Name field is set to Do Not Collect all other user fields (except for Document Name) are automatically set to Do Not Collect |
|
| Domain |
The print user's assigned domain. |
Dependent on the Collection setting of the Name field. If Name is set to Collect, then Domain will be set to Collect. |
| Full Name | The full legal name of the print user. |
|
| The print user's email address. |
|
|
| Position | The print user's position in the organization. |
|
| Phone number | The phone number assigned to the print user. |
|
| Manager | The name of the print user's manager. |
|
| Department | The organizational department assigned to the print user. |
|
| Location | The location assigned to the print user. |
|
Enabling a Region for Users
Organizations that are geographically spread across multiple countries and with employees frequently traveling across regions may require more than one region. Initially only one region is available to users, and it set up as the Default Region. However, you have the option to enable multiple regions for your users if required.
Follow these steps to enable a region for users. After a region is enabled, they become available at the Print Scout for selection by an admin user (via the Print Scout Config Tool) or by an end user (using the Pharos Print desktop app).
1. Navigate to the Profile > Data Privacy tab.
2. Select the region that you want to make available to users.
3. Click the Configure button.
4. In the Available to Users, move the toggle to the ON position.
5. Review the Information Collection Settings and change it if required.
6. Save the changes.
7. Repeat this process for every region you want to add to the system.
To disable a region, simply switch the Available to Users slider to the OFF position.
Note: Restart the Print Scout Spooler Service or wait for 24 hours for the changes to take effect.
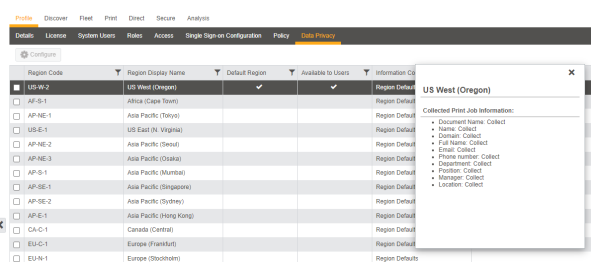
Viewing Print Job Information Collection Settings for a Region
Hover over a region’s Information Collection column shows the information collection setting for that region.
Deploying Regions
Preparing a Windows Print Scout Package
This release supports installing the Data Privacy and Document storage capable Print Scout on the following versions of Windows.
- Microsoft Windows 10
- Microsoft Windows 11
1. Install the Print Scout on any supported Windows machine.
2. Launch the Print Scout Configuration tool by running the Configuration executable from
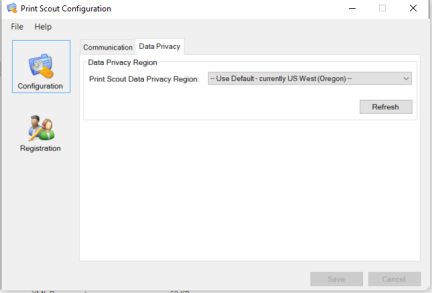
3. Choose the required Data Privacy region.
4. Click Save.
5. Create the deployment settings file by clicking File > Create Deployment Savings file.
6. Locate the InstallConfig.ini file (typically in the
7. Repeat the process for every deployable region.
Preparing a macOS Print Scout Package
The Mac Print Scout Configuration Tool does not have a config option to specify a 'Scout-specific' region, however it is still possible to deploy mac scouts with a particular region assigned. There are two ways on how to do this:
Option 1:
1. Create deployment file on a Windows Scout where Scout region has been set.
- On the machine on which you installed the first Windows Print Scout, open the Print Scout Configuration tool (Configuration.exe) from the install directory (typically C:\Program Files (x86)\PharosSystems\PrintScout ) .
- Click the File menu and then select Create Deployment Settings file.
2. Create deployment file on macOS Print Scout
- On the machine on which you installed the first Mac Print Scout, open the Print Scout Configuration tool from the directory /Library/Application Support/Pharos/PrintScout.
-
With the Mac Print Scout Configuration dialog active, open the menu and select Create Deployment Image.
3. On the machine and replace the InstallConfig.ini file in dmg with the one created on the Windows scout.
4. Run the deployment package on mac using the replacement InstallConfig.ini file.
Option 2:
1. Create deployment file on macOS Print Scout
- On the machine on which you installed the first Mac Print Scout, open the Print Scout Configuration tool from the directory /Library/Application Support/Pharos/PrintScout.
-
With the Mac Print Scout Configuration dialog active, open the menu and select Create Deployment Image.
2. Locate the InstallConfig.ini file created on the Mac.
3. Update the following line in the InstallConfig.ini to include a valid region code:
DefaultDataPrivacyRegion=
For example, set DefaultDataPrivacyRegion=EU-W-2
Deploy Print Scout to User Workstations
The Windows Print Scout is typically an automated software installation utility, such as Microsoft Systems Management Server (SMS).
Refer to the Deploy Print Scouts document for more information.
Assigning Regions Via Import
The Default region (region set up in the web console) is applied to Chrome extension users. However, if you want to use a different region or set a region per user for Chrome extension users, you will need to import regions.
Follow these guidelines for a successful import:
- You must include headers in the CSV file. If a header is not included, the first line of data will be treated as the header and ignored.
- Use the Region Code (e.g. AF-S-1, EU-N-1) for the Data Privacy Region column.
1. Prepare a CSV file following the guidelines above.
2. Navigate to the Secure > Advanced screen and then go to the User Registration section.
3. Click the Import button.

4. Select the CSV file to import.
5. Map data by dragging CSV column headers to the appropriate data column. The mapping view shows the CSV fields in the left column, called CSV columns. The fields in Secure Print appear in the right column, called Data Columns.
![]()
6. Click the Preview tab to see up to the first 50 rows of CSV data and verify that the mappings are correct.
7. Click OK. A window displays the results of the import, the number of rows processed, and any errors during the import process.
Related Topic