Configuring Networks
As an administrator, you can group related Secure Release components (Device Scout, Print Scout, and printers) into segments called networks. You create a network by grouping a list or range of IP addresses of geographically related scouts and printers. It defines how the scouts and printers communicate on the network.
The networks feature enables distributed organizations to manage printing in distinct segments, for example, large companies with many sites across geographic locations or companies with remote branch offices. By defining networks, you specify which scouts and printers are geographically close to each other to efficiently route print jobs and manage secure printers. For example, you can configure your environment to avoid routing a print job through a specific geographical area.
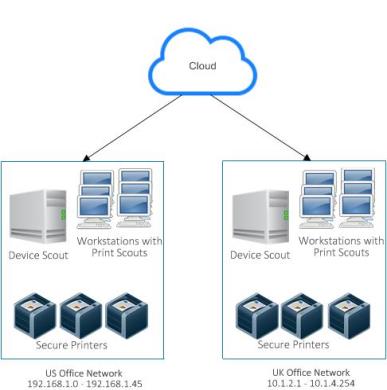
The following diagram shows an example of a site with two configured network segments (with non-overlapping IP addresses).
By implementing separate networks, you can:
- Improve the performance of Secure Release. Scouts and printers communicate, under most circumstances, within their network group, thus reducing the volume of WAN traffic and reducing network congestion.
- Simplify troubleshooting.
- If a problem occurs, you have a smaller subset of scouts and printers to troubleshoot.
- The Networks screen shows a visual representation of the relationship between secure printers (secured via Printer Screen release) and the controlling Device Scouts.
When to use networks
The networks feature is recommended for sites with either or both of the following features enabled:
- Cloud storage
- Printer Screen Release
Understanding the relationship between the scouts and secure printers will help you decide whether your organization can benefit from implementing networks. The following section explains the relationship among Print Scouts, Device Scouts, and Secure Printers and how networks affect print release and secure printing.
Print Release
The Print Scout is the component responsible for routing print jobs from workstations or a cloud queue to secure printers. The following scenario illustrates how print jobs are routed to printers when networks are configured.
Assumptions:
- Print Scouts are installed on user workstations.
- Cloud and On-premises storage options are both enabled.
- Two networks with non-overlapping IP ranges are created: US Network and UK Network (example only)
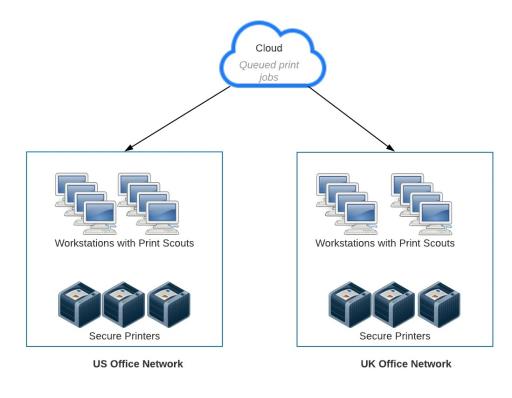
- A user in the US office submits a print job from a workstation. The Print Scout stores the print job in the local workstation and sends a copy of the job to the cloud queue.
- The user attempts to release the job from a secure printer at the US office.
- The Print Scout on the user's workstation releases the job at the secure printer in the US office.
If the original workstation is offline or in sleep mode at the time of release, the system will choose any available Print Scout (on the same network as the originating workstation) to download the job from the cloud queue and release it at the secure printer. By implementing networks on sites with remote locations, traffic between remote sites is minimized. Instead of print jobs crossing the WAN constantly, the system will route print jobs to another Print Scout in the same network group as the originating workstation before trying a Print Scout from a different network.
Note: If you want to route print jobs via print server only, choose the option to Force delivery via print servers (in the Secure > Settings tab). This forces delivery of jobs to Print Servers instead of local workstations.
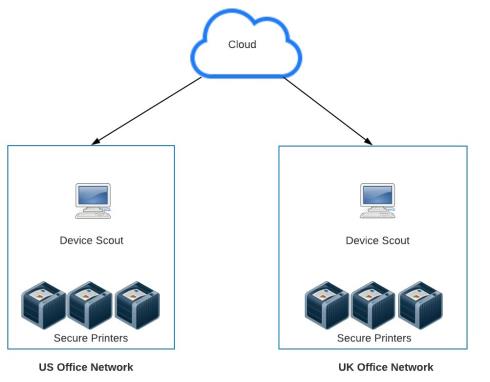
Managing Secure Printers (for Printer Screen Release)
For Printer Screen Release, the Device Scout deploys and controls the Secure Print app on the printer. It secures devices and authenticates users to your Active Directory. When you secure a printer for Printer Screen Release, you establish the preferred network route between the Device Scout and the printer. This means that the secure printer will only communicate with the Device Scout which deployed the Secure Print app.
Typically, a site would only need one Device Scout. However, for geographically dispersed sites, it may be necessary to distribute Device Scout across branch offices. In such a scenario, the system randomly selects a Device Scout to secure a printer, so you could potentially have a Device Scout in a remote location securing a printer (for example, a US printer secured by a UK Device Scout). This setup will work, but it will affect the performance of Secure Print due to the WAN traffic generated when secure printers contact a remote Device Scout for user authentication, for example. This issue can be further exacerbated when you have multiple secure printers crossing a WAN to contact a remote Device Scout.
By implementing networks, you can isolate the communication between printers and the Device Scout within the same network preventing unnecessary WAN traffic. In the following diagram, one Device Scout is installed per network. When an administrator secures a printer in the US office, the system will select the Device Scout that is in the same network as the printer (in this case the US Device Scout instead of the UK Device Scout).
Note: Ensure that your Device Scout is always online. Otherwise, Printer Screen release will not be available.
Limitations
- CIDR notation (e.g. 192.168.1.0/27) is not supported.
- Overlapping networks are not supported. For example, a company with remote offices using the same IP addressing scheme (either partially or entirely the same).
- Multiple Device Scout on the same network is not recommended. Only one Device Scout is required per network segment.
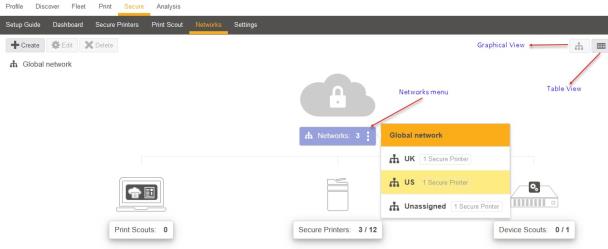
Networks Screen
The Networks screen shows the grouping of scouts and printers within your organization. This is where you create, edit, view, or delete networks. It provides a quick glance of your Secure Release configuration - for example, you can tell if the Device Scout in a network segment is offline so you can take appropriate action.
Initially, the system automatically creates a network called Global network. In this setup, all printers and scouts are in the same global group and are assumed to be able to communicate with each other. The Networks screen shows a breakdown of printers and scouts by network segment:
- Print Scouts – Shows the number of installed Secure Release capable Windows or Mac Print Scouts that have reported health status in the last month. This does not include Uniprint Scouts and uninstalled or disabled Print Scouts.
- Secure Printers – Shows the number of secured printers out of the total printers capable of being secured. This includes printers secured for all print types (mobile, printer screen, and SR25 hardware). It also includes printers with an error status.
- Device Scouts – Shows the number of Device Scouts out of the total installed Secure Print-capable Device Scouts that have reported health status in the last month.
Creating a Network
- Navigate to Secure > Networks.
- Click the Create button.
- Enter a unique name to identify the network.
- Specify the IP addresses or IP address range to include in the network group. You can add IP addresses in any of the following formats:
- Individual IP address
- An IP range, such as 10.0.1.1 - 10.0.3.254
- You can also import a text file which contains a list of IP addresses or IP ranges. An IP address range should consist of a single line item with two IP addresses separated by a hyphen.
5. Click Save.
Note:
- The error message Duplicate IP address range indicates that there is an overlapping IP address.
- The Unassigned network is a grouping of components that do not belong to any network segment. You can’t secure a printer (for Printer Screen Release) if it is Unassigned.
Editing a Network
You can modify details of an existing network. For example, you can rename the network or update the defined IP range for the network. To edit a network in graphical view, click on the Networks menu. A drop-down list of available networks appears. Select the network that you want to edit, and then click the Edit button.
To edit in the table view, select the network you want to edit from the list of networks and then click the Edit button. This opens the Edit Network dialog.
Deleting a Network
To delete a network in graphical view, click the menu icon and then select the network that you want to delete. Click the Delete button.
On-Screen Messages
If you see this message... X Device Scout is/are either offline or not compatible to use with the Networks Features. Printer Screen Release will be impacted. Please review the Scouts status to bring secure printing back.
...follow these steps:
- Determine if the Device Scout is offline:
- Check if the machine on which the Device Scout is installed is online.
- Check if the Secure Print Service and the Device ScoutService are running.
- Check if the Device Scoutis compatible with the Networks feature. Older Device Scouts do not support the Networks feature. Please update your Device Scout to the latest version.
- Check if the networks are configured correctly. If configuring networks for Printer Screen Release, make sure that each network segment has a matching Device Scout. Without a matching Device Scout in the network, you will not be able to secure a printer. Also, make sure that the network includes the IP addresses of your Device Scout and printers.