Secure Release and OpenID Connect (OIDC)
Overview
Every print user must first register to Pharos Secure Release before they can print documents. Registration is required to establish the identity of users who submitted a print job. The Print Scout component of Secure Release is responsible for facilitating user registration.
Secure Release supports three authentication providers for user registration.
- Email Authentication – Print users register their email address with a PIN code from the Pharos Print Setup Guide.
- Active Directory – This option is suitable for organizations that use Windows Active Directory (AD) for managing users. The Print Scout uses the user’s workstation ID to establish the identity of the user. This option does not require user registration.
- OpenID Connect – This option uses token-based OpenID Connect technology to verify print user identity. This option is suitable for organizations with an existing supported OpenID Connect Identity Provider (e.g., Azure AD, Google).
This document covers how to set up OpenID Connect as an authentication provider for Secure Release
What is OpenID Connect?
The OpenID Foundation defines OpenID Connect (OIDC) as a simple identity layer built on top of the OAuth 2.0 protocol. It allows clients to verify the identity of the end-user based on the authentication performed by an identity provider, as well as to obtain basic profile information about the end-user.
You can get more information about OpenID Connect from this website.
Benefits of OpenID Connect for Secure Release
- Integrates with well-known identity providers like Microsoft® Azure AD, Google, etc.
- Eliminates the responsibility of storing and managing user credentials.
- Separates the user’s print identity from the workstation’s login identity. It does not matter what the user logs in as.
How OpenID works with Secure Release
Install Print Scout on Users' Workstations
Print Scout must be installed on users’ workstations. The Print Scout installs the Pharos Print desktop app, which enables user registration. During user registration, the Print Scout will obtain the user’s email address from the returned identity token. That email address then becomes the user’s identity for printing.
Pharos Secure Release supports Print Scout installation on Windows, macOS, and Linux. Refer to the Secure Release documentation for the list of supported versions.
Note: Linux Print Scout does not install the Pharos Print desktop app. User registration starts by submitting a print job to the default Pharos Secure Printer that the Print Scout installs.
User Registration Workflow
1. The user starts registration.
- On a Windows or Mac workstation, the user launches the Pharos Print desktop app.
- On a Linux machine, the user starts registration by sending a print job to the default Pharos Secure Printer.
2. On the screen that appears, the user clicks the Login to continue link.
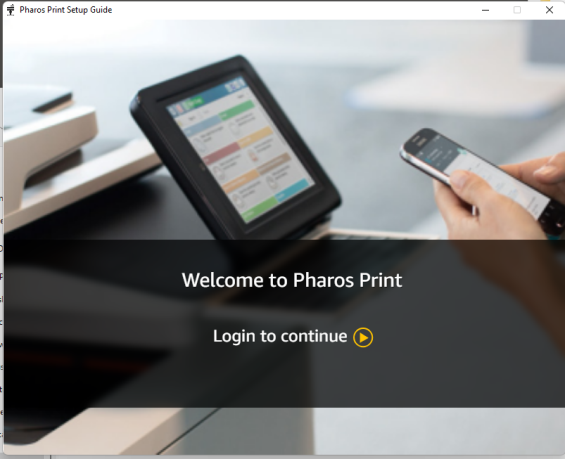
3. The link redirects the authentication request to the organization’s identity provider. The user is prompted for their email address and password.
The screen shown to the user depends on the organization’s identity provider. The following example shows Azure AD login screens.
4. When authentication is successful, the user sees the message “Authenticated successfully”.
5. Once logged in, the user can submit subsequent print jobs without having to provide credentials again.
Releasing Documents from a Secure Printer
Users authenticate themselves at the printer control panel by swiping their access badge (proximity card) or entering a Passcode provided by Print Scout, if enabled. Users’ card ID and Passcode are associated with their OpenID email accounts. Secure Release provides the facility to import users’ email addresses and card IDs into Secure Release. Secure Releasealso provides the facility to self-register badges using a system provided Passcode, for supported printer manufactures.
1. A user walks up to a Secure Printer.
2. The user swipes their proximity card (associated with their OpenID email address) or enters the system provided Passcode.
3. Once authenticated, users can select the documents they want to release.
User Registration Technical Details
This section explains what goes on behind the scenes with OpenID user registration.
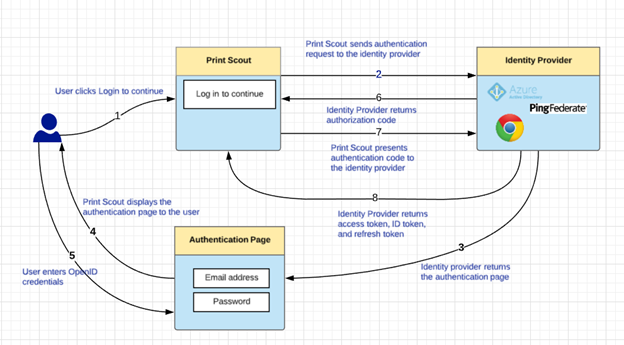
1. The user begins registration.
- Windows and macOS machines: User launches the Pharos Print desktop app.
- Linux: User sends a print job to the default Secure Printer.
This takes them to the login dialog box.
2. The user clicks the Login to continue link. The link redirects the authentication request to the identity provider (e.g. Azure AD), including the following parameters: client ID, client secret, scope, redirect uri, response type, and so on.
3. The identity provider returns the authentication page.
4. The Print Scout displays the authentication page to the user. The authentication page prompts the user for OIDC credentials.
5. The user enters their credentials. The identity provider gets redirected to the Secure Release Identity Service to complete the authentication process. The Secure ReleaseIdentity Service, in turn, redirects back to the Print Scout.
6. Upon successful authentication, the identity provider responds with an authorization code.
7. Using the authorization code obtained from the identity provider, the Secure Release Identity Service sends a request to exchange the authorization code with an access token.
8. The Identity Provider returns access token, ID token (with user information), and refresh token. Secure Release stores these tokens.
The Print Scout now has access to user information (e.g. email address) from the ID token. The email address becomes the user’s identity for printing at the printer.
Secure Release OpenID Specifications
Authorization Flows
Authorization flow defines how an application receives tokens. OpenID Connect supports the following flows (also called grant types) for authentication:
- Authorization Code
- Implicit
- Hybrid
The Secure ReleaseIdentity Service uses the “Authorization Code Flow” by default. When the Print Scout sends an authentication request to the identity provider, the identity provider returns a short-lived authorization code to the Secure Release Identity Service. This authorization code is used by the Secure Release Identity Service to get access token, refresh token, and identity token.
Note: Implicit Flow is not supported.
Scope
The Secure Release Identity Service redirects the user to identity provider with the following scopes by default.
| Scope | Description | Claims Supported |
|---|---|---|
| openid | Required. This indicates that the Print Scout intends to use the Open ID protocol to verify a user’s identity. | |
| Required. This scope returns the email claim, which contains the user’s email address. This email address is used to identify the user at the Secure Printer when releasing print jobs. | ||
| profile | Optional. This can be used to personalize Secure Release. For example, you can request the user’s name to show in the printer. |
Notes:
- Secure Release uses the standard scopes and claims as defined in Oauth 2.0. If your identity provider uses customized scopes (e.g. your system expects mail instead of the standard email scope), contact the operations team.
- Offline_access is not part of the scope list.
OpenID Connect Configuration
You’ll need to register Secure Release as an application to your OpenID identity provider and gather the following information.
- Well-known endpoint
- Client ID
- Client Secret
Well-Known Endpoint
Secure Release uses Well-Known Endpoint (also called “discovery document”) to retrieve metadata about your Identity Provider. This is used to configure user authentication sessions automatically. It returns information like the issuer name, key material, supported scopes, token endpoint URL, and so on. See the OpenID specification document (https://openid.net/specs/openid-connect-discovery-1_0.html) for more details.
The Well-Known endpoint includes 2 URLs: token_endpoint and jwks_uri.
Note: All URLs contained with the discovery metadata need to publicly accessible.
OpenID providers publish their metadata at a well-known URL. Here are some examples:
- https://login.microsoftonline.com/common/v2.0/.well-known/openid-configuration
- https://accounts.google.com/.well-known/openid-configuration
Client ID
Client ID also called “Application ID” is a unique identifier assigned to your Print Scout by your Identity Provider.
Client Secret
Client Secret also called “Application Password” is the secret key that the Print Scout uses to prove its identity when requesting a token.
Redirect URI
Redirect URI (also referred to as “reply URL” or “callback URL”) defines the URI where the IdP sends responses to authentication requests.
The redirect URI for Pharos Cloud is:
https://api.beacon.pharos.com/login/connect/external/signin-openidconnect