User Management
Overview
User Management enables Pharos Cloud administrators to effectively manage end users and groups comprehensively. Administrators can now quickly identify users and access user information at a glance. User details, user groups, or user activity are now conveniently accessible within the Pharos Cloud.
The User Management view allows administrators to perform the following tasks:
-
Review and manage registered users: Administrators can view and oversee all users registered in Pharos Cloud.
-
Group-based Viewing: Users can be filtered and displayed based on their assigned groups.
-
Monitor User Activity: Administrators can track user activity (e.g. how many jobs the user has printed) within Pharos Cloud.
-
Update and View User Details: Administrators can modify or review user properties such as Data Privacy Region, and other user-associated data.
Note: Modifying user details is restricted by the Source type, which indicates how the user record was acquired. To make changes to user details, you must first switch the Source to Manual and then adjust the value accordingly. You can find more information about editing user properties in the Edit User Properties topic.
-
Retrieve User Registrations: Essential user information such as registered methods (e.g., Cards, Mobile app, passcode) can be viewed per user.
-
View Accounts assigned to a user - Administrators can view accounts assigned to a user.
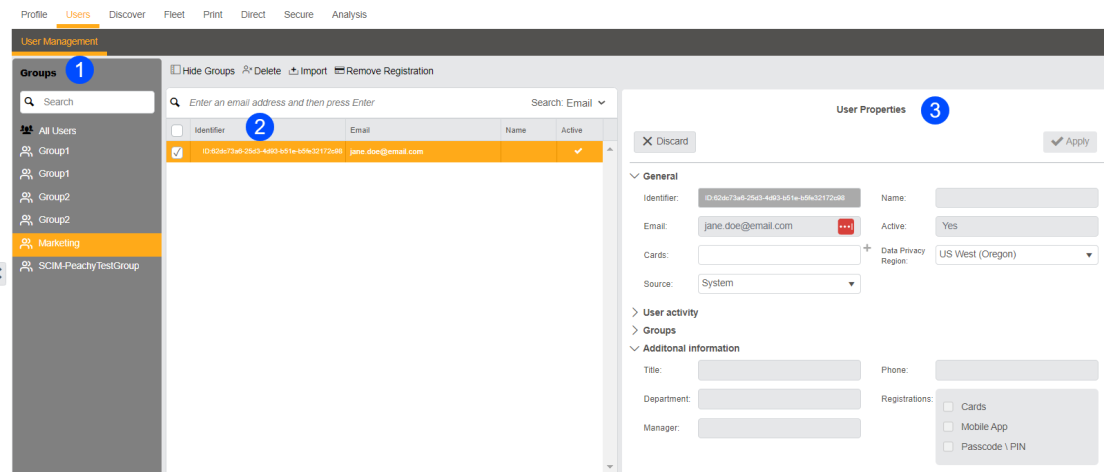
The Users > User Management section provides administrators with a comprehensive view of all users within the system. The User Management section consists of three parts:
1 - The left pane displays a list of groups.
Note: The “All Users” option shows a view of all users within Pharos Cloud.
2 - When a group is selected, the middle pane displays the users associated with that specific group.
3 - The right pane shows the User Properties associated with the selected user.

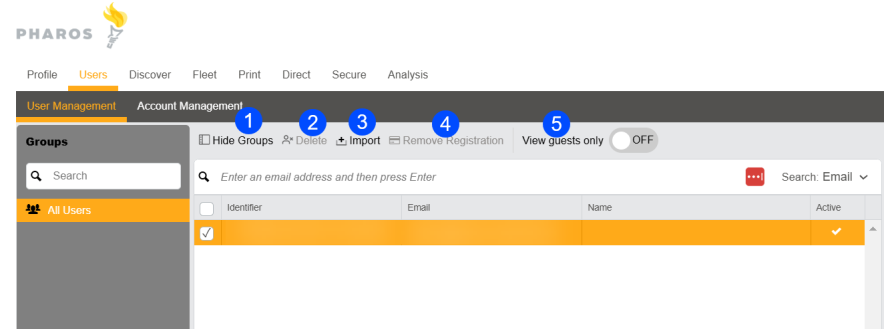
The User Management view includes the following action buttons:
-
Hide/Show Groups – Toggle to show/hide groups list from the web console.
-
Delete – Use this action to remove registered print users from the system. Take note that users are deleted from the user identity database but not from the reporting database.
-
Import – Use this action to import users and their associated information (prox cards, user groups, data privacy region) into Pharos Cloud.
-
Remove Registration – Use this action to remove a user’s associated proximity cards, Passcode/PIN, or mobile app registration.
-
View guests only– This action enables administrators to filter and display only guest users in the user grid. This simplifies the management and visibility of guest accounts within Pharos Cloud.

Populating users and groups in the User Management tab
Users and their groups (if any) are added to the User Management tab in the following ways within Pharos Cloud:
-
User Registration: When a user successfully registers in Pharos Cloud, their user record is automatically added to the User Management tab. This typically occurs when users register to Pharos Cloud using the Print Scout, Chrome Print, or the End-User portal.
-
Print Job Submission: When a user submits print jobs to Pharos Cloud, a Print Analytics synchronization is triggered. See the Print Analytics Synchronization topic below for more information.
-
User Import: Administrators have the option to import groups of users into Pharos Cloud in bulk, which automatically populates the User Management tab with the corresponding user records.
-
SCIM Import: Users can be added to Pharos Cloudthrough SCIM (System for Cross-domain Identity Management) import. SCIM allows for the automated provisioning and synchronization of user accounts across different systems. When users are added via SCIM import, their user records are synchronized with Pharos Cloud, and they appear in the User Management tab.
Print Analytics Synchronization
Pharos Cloud operates using two databases:
-
Operational database, which primarily stores login-related details such as email addresses and active registrations.
-
Reporting database, where data from Active Directory and print jobs are stored. By default, user information (e.g Name, Title) are automatically gathered from Active Directory whenever users print and are later stored in the Reporting database.
The User Management tab retrieves user information from the operational database. Pharos Cloud performs a process called “Print Analytics synchronization” to gather a more comprehensive and meaningful set of user data. This process combines user information from the reporting database into the operational database ensuring that user data stored in the reporting database is accurately reflected in the operational database.
Print Analytics synchronization is triggered whenever a user’s print jobs are reported. The next time the User Management tab retrieves user information from the operational database, it will obtain a more comprehensive set of user data.
When Pharos Cloud detects a print job for a specific user, the following user information is automatically populated from the reporting database if available. This automatic update takes place for users whose source is configured as "System."
-
Job Title
-
Department
-
Manager
-
Phone
-
Name
-
Email
SCIM Source and Print Analytics synchronization
When a user's source is set to SCIM, synchronization with the reporting database will only update the following non-SCIM properties: Job Title, Department, and Manager fields.
Notes:
-
If a user record doesn't have a matching display name, Print Analytics Synchronization will fail.
-
If the user record phone number has a different phone number from SCIM, the Print Analytics synchronization will fail because the phone number is an SCIM property.
SCIM Integration Known Issues
-
When an administrator removes a user connection to SCIM, their Active status in the User Management tab will be set to “No” indicating that they are no longer actively synchronized with Pharos Cloud. However, even though they are marked as inactive, users will still be able to log on to the Print Scout and continue to use Pharos Cloud features.
-
To revoke a user's access to Pharos Cloud features, you must disable the user from the SCIM integration. This action will effectively deactivate their access to Pharos Cloud.
-
Once a connection with SCIM is established, we do not recommend using the user import function to add users into Print Analytics. This will break the SCIM import. You can however use the user import function to add cards or Data Privacy Region.
Managing Users
View Users
Administrators can view users and user information from the Users > User Management tab of the web console.
-
To view all users registered in the Pharos Cloudsystem, select "All Users." menu and click on a user from the list to access individual user properties and details.
-
To view individual users belonging to specific groups, choose the desired group from the left-hand menu and click on a user from the list to access individual user properties and details.
-
Users not belonging to a group will be in the “All Users” option
View User properties
Once a user has been selected, the following properties can be viewed and/or configured for users. Properties are organized into the following categories.
General
| User Property | Description |
|---|---|
| Identifier | Unique identifier for each user within Pharos Cloud. This is particularly useful for troubleshooting purposes. It allows administrators or support teams to easily locate and identify individual user accounts within the system. |
|
A user’s registered email address from OpenID, Active Directory or SCIM. Note: The Email field cannot be updated. |
|
| Cards | Shows the number of cards registered with the selected user. |
| Active | Shows ‘No’ when a user has been marked as deleted from SCIM. Shows “Yes” for all other cases. |
| Name | Username derived from Print Analytics when a user prints a job. This information may come from Active Directory or SCIM. |
| Data Privacy Region | Shows the data privacy region assigned to the user. |
| Source |
Defines the origin of user data. There are three source types:
|
| Guest User |
This property is only shown when the selected user is a “guest user”. Note: Guest Users details cannot be edited from the User Management tab. |
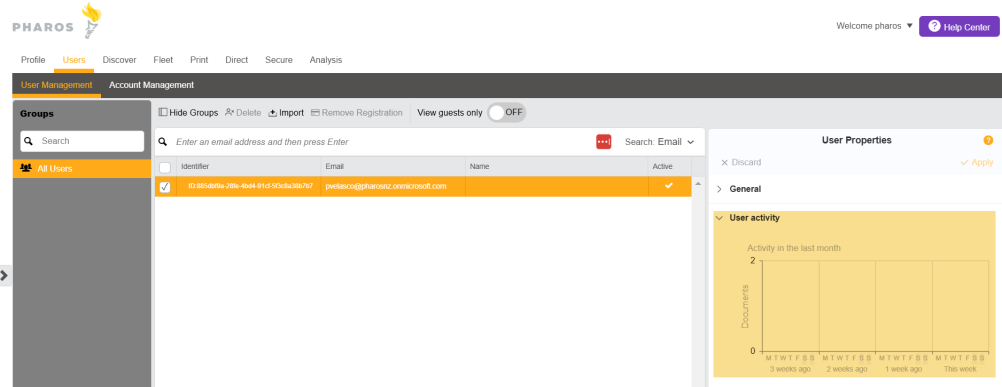
User activity
The User Activity view offers a graphical representation of the user’s printing activity over the past 30 days. It is based on the 30-day information kept in Print Analytics.

Groups
The Groups property displays one or more groups assigned to the user.
Note: If the source is labeled as “System,” editing the group is restricted. To modify the Groups field, you must first change the Source to “Manual.”
Additional information
The following information about the user that are populated from Print Analytics when a user submits a print job.
-
Job Title
-
Department
-
Manager
-
Phone
Registrations
Read only property that lists all the active registrations for the user.
Accounts
The Accounts section enables administrators to manage user accounts directly within the User Management screen. This section is organized into two categories:
-
Global and group assignments - This section displays all global accounts that have been assigned to a user, including those that the user has access to through their membership in a group. When you click on an account, it opens in the Account Management tab.
-
Direct user assignment - This section allows administrators to directly assign accounts to individual users. It also shows accounts that have been assigned to users from the Accounts Management tab.
Note: When assigning an account directly to a user from the User Management tab, the account will not appear in search results if any of the following conditions are met: the account is expired, disabled, or configured for Access by Groups and Users only.
Edit User Properties
Notes on editing user properties:
-
When the source is configured as "System," modifications can only be made to the "Cards" and "Data Privacy Region" properties. To edit other properties while the source is set to "System", you will need to change the source to "Manual." This allows other properties to become editable. Once set to Manual, user information cannot be updated automatically from a Print Analytics synchronization.
-
If the source is “SCIM” only the “Card” and “Data Privacy Regions” can be edited. All other properties are read-only.
-
The multi-select operation is restricted to a maximum of 100 users.
-
The maximum supported data size for updates is 2 MB.
-
Pharos Cloud supports up to 500,000 users and 1,000 groups.
To edit user properties:
-
Navigate to the Users > User Management tab.
-
Select the user whose properties you wish to edit. You can search a user by email address.
-
In the User Properties on the right-hand side of the web console, update the user properties as needed.
-
Save the changes to the user properties by clicking the Apply button.
Delete Users
-
Navigate to the Users > User Management tab.
-
Select the user or users you want to delete. You can search a user by their email address.
-
Select the Delete button
-
You’ll receive a prompt confirming if you want to delete the selected user(s).
-
Click the Delete button.
-
Upon successful deletion of the user, you will receive a "Successful!" message.
Note: When a user is deleted from the User Management tab, the user record is removed from the user identity database but remain in the Print Analytics database.
Import Users
-
Prepare a CSV file following the guidelines above or download the sample CSV file.
-
Navigate to the Users > User Management screen.
-
Click the Import button and then select the CSV file to import.
-
Map data by dragging CSV column headers to the appropriate data column. The mapping view shows the CSV fields in the left column, called CSV columns. The fields in Secure Release appear in the right column, called Data Columns.
-
Click the Preview tab to see up to the first 50 rows of CSV data and verify that the mappings are correct.
-
Click OK. A window displays the results of the import, the number of rows processed, and any errors during the import process.
View Accounts Assigned to a User
-
Navigate to the Users > User Management screen.
-
Select the user whose account you want to view.
-
In the User Properties panel, locate and select the Accounts tab. This will show you the accounts currently assigned to the selected user.
Remove Registration
The Remove Registration function enables administrators to eliminate any registrations associated with a user. Registrations may include proximity cards, mobile apps, or passcodes.
-
Navigate to Users > User Management tab.
-
Select one or more users whose registration you wish to remove.
-
Select the Remove Registration button.
-
Select one or more registrations you want to remove. The options are Cards, Mobile App, or Passcode\PIN.
-
Click the Remove button.
-
Upon successful removal of the selected registrations, you will see a ‘Successful’ message.