macOS Direct Print v2.0
The macOS Print Scout component of Pharos Cloud has been updated to support Direct Print v2.0. The Print Scout installs the Pharos Print desktop app , which is a desktop application used to manage direct printers (e.g. add or remove direct printers).
Limitations
- Queue synchronization is not automatically triggered on a macOS Scout during user logon, unlike the behavior on a Windows Scout where queue synchronization events occur at user logon. This inconsistency between Windows and Mac Scouts results in certain actions not taking place on the Mac Scout. For instance, if an IT admin adds a new IPP auto-install queue on the web client, the new queue will be added to the Windows Scout during the user's next logon. However, it will not be automatically installed on the Mac Scout when the user logs on. Auto-installation will occur on the Mac Scout if the Print Scout Spooler Service is restarted or during the scheduled daily settings update.
-
On macOS Ventura, you may come across Media and Quality options, but if you expand it, it will be empty. This option should not be displayed as it is not currently supported by macOS Print Scout.
-
If the Pharos Print desktop app is already added to the menu bar, clicking the Pharos Print desktop app icon from the launchpad won’t open the app as it did in previous versions and as it currently does in Windows Scout. This occurs because macOS can only run one instance of the Pharos Print desktop app at a time. Since it’s already in the menu bar, the system believes the instance is already running. If you need to quit the app from the menu bar for any reason, you can re-launch it from the Launchpad, and it will be re-added to the menu bar.
-
The Pharos Print desktop app icon has been removed from the Dock. As a result, if thePharos Print desktop app dialog is open, it may hide behind other open windows. The only way to bring it back to the foreground is through the menu bar icon's context menu.
-
On Apple Silicon-based macOS systems (macOS 14 Sonoma and macOS 13 Ventura), the Print Scout user interface is slow to open, taking approximately 5 seconds. This is a known issue that will be addressed in future versions
-
On macOS, the default 'Paper Size' and 'Duplex' options configured for IPP direct print queues in the web console are not applied. This occurs because macOS manages these settings through the Printer Preferences dialog, which includes options such as 'Default Settings', 'Last Used Settings', or 'Presets'. As a workaround, users will need to manually set the 'Paper Size' and 'Duplex' settings in the Printer Preferences dialog each time they print.
macOS Direct Print User Experience
1. The user receives an invitation to use Direct Print.
2. The user launches the Pharos Print desktop app by clicking the Pharos Print desktop app on the menu bar.

3. First-time users will be asked to log in with their company username and password. When successfully authenticated, users will see the Authenticated successfully message on their browser.
Depending on how print queues are configured, users can either print right away, manually select a location, or manually add a printer.
Auto-install Printers
Auto-install printers (i.e., auto-install print queues) are automatically installed on user workstations based on a user’s location. This allows users to print immediately as soon as they connect to a network. When the user moves to a different location, the printers from the previous location are removed and printers from the new location are added.
Note: Auto-install printers require configuration of network information on the Print Analytics web console.
Auto-install Printers (Manual selection of workstation location)
Users can manually choose their location from the Pharos Print desktop app. This is used when network information is not configured for any given location.
Manual-install Printers
Users can manually add the nearest printers themselves using the Pharos Print desktop app. Allowing users to manually install printers is particularly important for organizations with special printers that they do not want to be readily available to users. For example, administrators may choose to not automatically install color printers because they want to discourage color printing. But they want to provide users with the ability to add the printer themselves if they need to print in color.
To manually install printers:
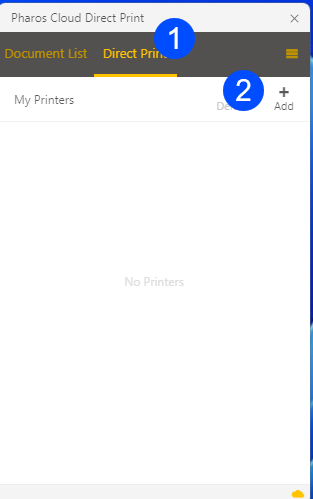
1. The user launches the Pharos Print desktop app, and the user selects Direct Print.
2. The user clicks the Add button to manually add a printer.
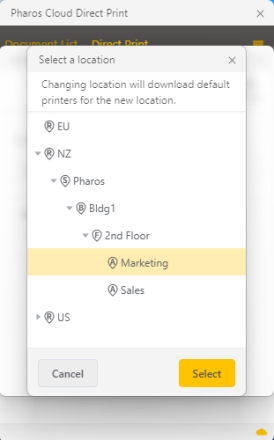
3. The user chooses a location from the location tree. A list of printers associated with the selected location is displayed.
4. The user selects a printer from the list of printers available for the selected location.
5. The user clicks the Add button to add the printer to the printer list.
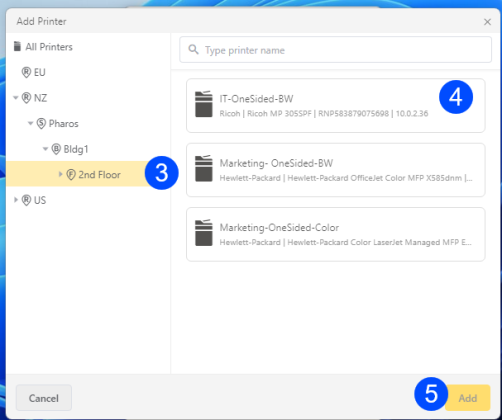
Users can also search for the printer by typing any of the following information Queue Name, IP address, or hostname.
Note: While Auto-Install printers are automatically removed when a user changes location, manual-install printers are retained. Users will need to manually delete them if they are no longer needed.
6. Once printers are set up, users print as they normally would.
Setting Workstation Location
Users can manually choose their location from the Pharos Print desktop app. This is used when network information is not available. When a user manually selects a location, auto-install printers will be automatically installed for the selected location.
To manually set a location:
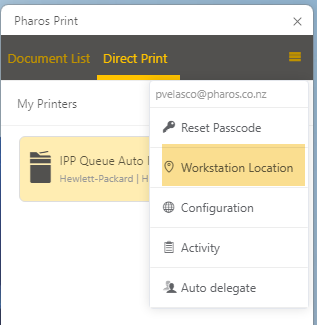
1. Launch the Pharos Print desktop app.
2. Click the menu on the upper-right-hand side as shown in the image below and then select Workstation Location.
By default, the workstation location is set to Auto-Detect, which means that the location is determined based on the workstation’s network information.
3. Select Manually set.
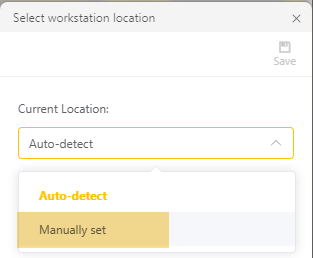
4. Select the desired location and then click Select.
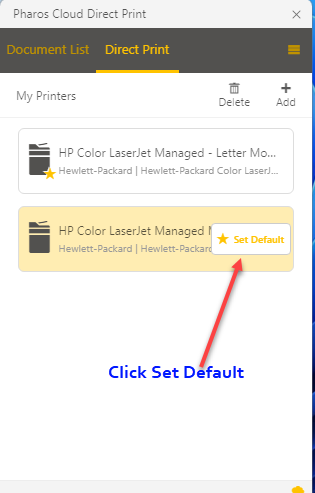
Setting a default printer
The Set Default option will set the direct printer as the preferred printer when printing. This option appears when you have more than one printer on the My Printers list.
Direct Printing to macOS
- Open the document you want to print.
- Print the document (File > Print) and select the printer you have added.
- Collect your document.