Register email address to Pharos Secure Release
Before you can activate Pharos Secure Release, you must first register your email address.
You will receive an email from your IT admin with instructions on how to register your email account to Pharos Secure Release. The registration process includes entering your email address, verifying your email address, and setting a PIN code associated with your email address.
- Launch the Pharos Print desktop app.
- On Windows, search for Pharos Print desktop app on the Start Menu. Selecting the app adds an icon in the task notification area (i.e. system tray area) located at the right end of your screen.
- On macOS, press ⌘-Space to open Spotlight then search for Pharos Print desktop app.
-
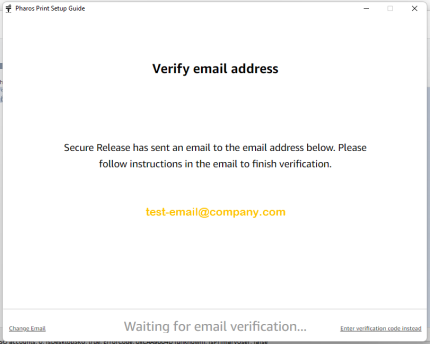
Clicking the desktop app opens the Pharos Print Setup Guide. Enter a valid email address to register and then click Verify. This ensures that the email address belongs to you.

-
The Verify email address screen appears.
-
Check your email and then follow the instructions in the email to complete email verification.
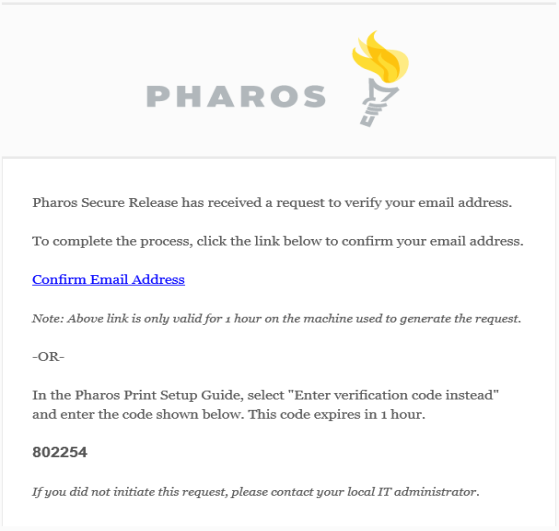
To verify email address, you can choose from either of the following options:
- Option 1: Click the Confirm Email Address link within the email. A web browser opens showing a message that the page will open the Setup Guide to verify the provided email address. When the Setup Guide opens, log in to continue.
- Option 2: Enter a verification code. In the Pharos Print Setup Guide, select Enter verification code instead and enter the code shown on the email.
Note: The link and the verification code are valid for one hour only.
-
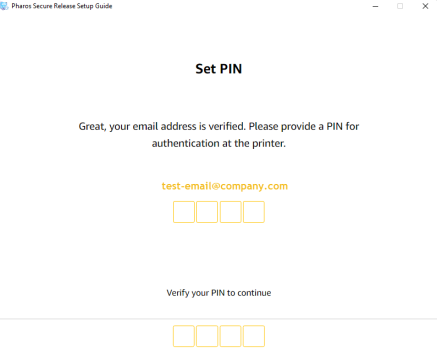
After your email address is successfully verified, the Set PIN dialog appears. Enter a 4-digit PIN code. You can use this PIN code with your registered email address to release documents from a printer.
You’ve registered your email address to Pharos Secure Release, the next step is to activate your preferred release method.