Configuring Cloud-Connected Devices
Cloud-connected devices (using the Cloud Site Service) provides a true cloud experience, eliminating the need for a locally installed Site Service and also not requiring running in a local network with direct line-of-sight access to print devices. Cloud connected devices support internet-only environments (sometimes referred to as zero-trust networks). This means that you can completely eliminate your print infrastructure, including print servers, print drivers, or queue management.
Supported Printer Manufacturers
-
HP
-
Ricoh
Step 1: Configure an Authentication Provider
Secure Release supports OpenID Connect for Single Sign-on (SSO) and email authentication.
Open ID Connect
When a user prints a document for the first time, they are redirected to the authentication provider’s (Azure AD, Google, etc.) login page. Users log in to Secure Release using their credentials from the authentication provider configured in the system. Once logged in to their provider, users are automatically logged in to Secure Release.
Configuring OpenID Connect
Before you can use OpenID Connect with Secure Release, you must first create and register an application for Secure Release in your OpenID provider. The OpenID provider assigns a unique Client ID/Application ID and Client Secret for the application after a successful registration. Record these values because you need them to configure Secure Release.
To configure an OpenID Connect authentication provider, follow these steps:
- Navigate to the Secure > Settings tab.
- In the User Authentication Providers section, select OpenID Connect.
- Enter the following details of the Secure Release application as provided by the OpenID authentication provider:
- Well-Known Endpoint
- Client ID
- Client Secret
- Save the changes.
Email Authentication
With email authentication, users register to Pharos Secure Release by providing an email address. The registration process includes entering an email address, verifying the email address, and setting a PIN code associated with the email address.
Configuring Email Authentication
Navigate to the Secure > Settings > Authentication Providers tab, select Email Authentication.
Step 2: Set up job storage
Navigate to the Secure > Settings screen, select Secure Release Settings and set up the storage option.
- When Cloud Storage is enabled - documents are stored, encrypted in the cloud. Documents will always be available for release.
- When Cloud Storage is disabled - documents are stored, encrypted in users’ local workstation only. User workstations must be online for release.
Step 3: Prepare your HP MFP
Note: To prepare your Ricoh device for Cloud Connector, refer to the Ricoh Printer Readiness Guide.
1. Configure the EWS Admin Password
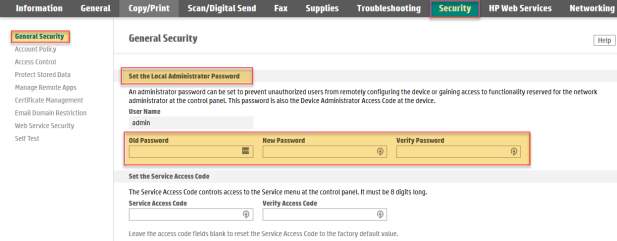
To prevent unauthorized access to the MFP as well as allow authentication between Secure Release and the MFP, you will need to configure the Local Administrator Password. This can be done by first browsing to the MFP’s Embedded Web Server (EWS) using a web browser and pointing it to the MFP’s IP address. Navigate to Security > General Security tab and complete the Set the Local Administrator Password section. Select the Apply button at the bottom right-hand corner to save changes.
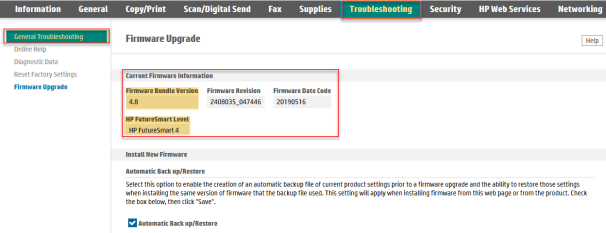
2. Make sure your HP MFPs have the latest firmware
Secure Release requires that your printer’s firmware must be at least FutureSmart 4.8.
3. Configure Web Service Security
To allow communication between Secure Release and the HP MFP, you will need to configure Cross-Origin Resource Sharing (CORS) and the associated Trusted Sites.
- Within the MFP’s EWS, navigate to Security > Web Service Security.
- Check the box labeled Enable Cross-Origin Resource Sharing (CORS).
- In the Trusted Sites box, type the relevant address (e.g. *.insights.hpondemand.com) and select the Add button.
Note: If no sites are added to the Trusted Sites list, then all sites are trusted (recommended setting if not existing Trusted Sites are present).
- Select the Apply button at the bottom right-hand corner.
4. (Optional) Configure Scan-to-Email
Scan-to-email can be enabled, and an SMTP server configured before authenticated scanning can occur.
- Within the EWS, go to Scan/Digital Send > Email Setup > Default Job Options and check the Enable Scan to Email checkbox.
- Configure the SMTP server, which you can do by selecting the Add button within the Outgoing Email Servers (SMTP) section.
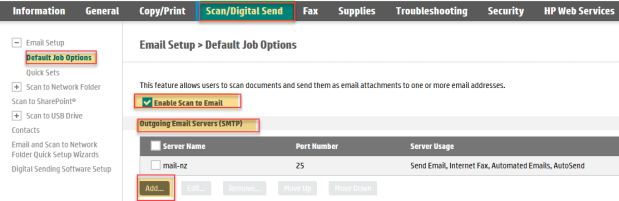
After you have configured all options, you will want to enter a test email address and credentials to ensure everything was configured correctly.
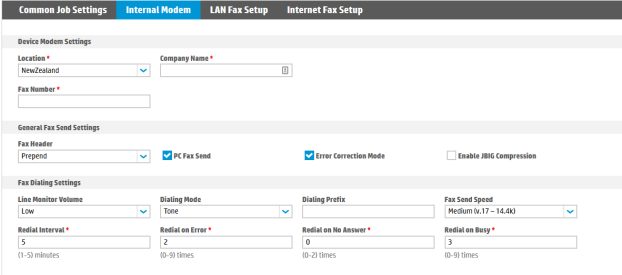
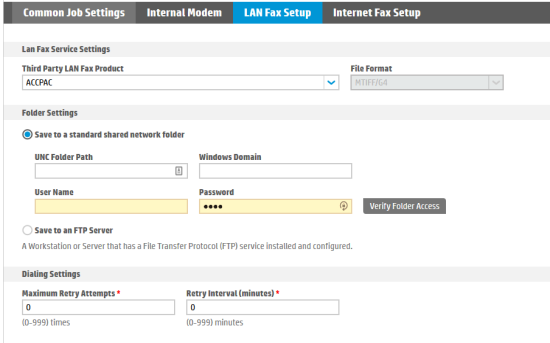
5. (Optional) Configure Fax
Fax capability can be enabled, configured, and user experience configured.
Within the EWS, go to Fax > Fax Send Setup > Default Job Options and check the Enable Fax Send checkbox. If you are using Analog Fax, choose Internal Modem from the Fax Send Method dropdown; if you are using RightFax, choose LAN Fax Service instead.
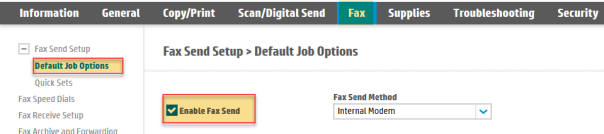
From here you can configure common user experience related settings, such as whether to ensure the right fax number is being used by forcing a user to type it twice, etc. in the Common Job Settings section.

Next, you will need to configure either Internal Modem (analog fax) or LAN Fax Setup (RightFax) settings.
6. Secure the Device for Use on Public Internet
There are many additional features available by default which open printers / MFPs to attack on the open internet unless properly configured or disabled. Refer to the Minimum Security Settings for HP Printers on Public Internet document for instructions on securing common attack vectors as well as additional recommendations for consideration when securing your print fleet.
Step 4: Install Print Scout
The Print Scout component is installed on print user workstations (running Linux, Windows, macOS, or Mac OS X). The Print Scout collects, stores, and reports user and print job information for Secure Release.
Note: In the case of Cloud Release, cloud-connected devices can retrieve print jobs directly from the cloud without the need for Print Scout. This feature is compatible with HP and Ricoh devices only. However, for traditional Secure Release Print Scout is required to push jobs to cloud-connected devices.
For more information about Print Scout, refer to the What is Print Scout document.
1. Download Print Scout
- Obtain the encryption key from the Operations team. An encryption key is required to download the Print Scout.
- Download the Print Scout from the Secure > Setup Guide screen of the web application.
You can download any of the following Print Scout packages:
- Linux Print Scout - This Scout is only available for OpenID authentication. The Linux Scout installs an IPP queue.
- Windows Print Scout - Installs a print queue that uses a default IPP Class Driver.
- Mac Print Scout - In Cloud Connector mode, where both cloud storage and Cloud Site Service are enabled, the Mac Print Scout will install Cloud IPP-based queue. In all other cases, it will default to installing an Apple AirPrint IPP queue, unless the you opt to create a customized package and use a different manufacturer's driver to create secure queues.
For more information, refer to the Download Print Scout document.
2. Install Print Scout on users' workstations
Installing Windows Print Scout
For information on how to install Print Scout on user workstations, refer to the Install Print Scout on workstation document.
For information on how to deploy Windows Print Scouts to multiple machines, refer to the Deploy Print Scouts document.
Installing Linux Print Scout
For information on how to install Print Scout on Linux machines, refer to the Installing Linux Print Scout document.
Note: The Linux Print Scout is only available for sites with OpenID Authentication.
Installing Mac Print Scout
For information on how to install Print Scout on Macs, refer to the Installing Mac Print Scout document.
For information on how to deploy Mac Print Scouts to multiple machines, refer to the Deploy Print Scouts document.
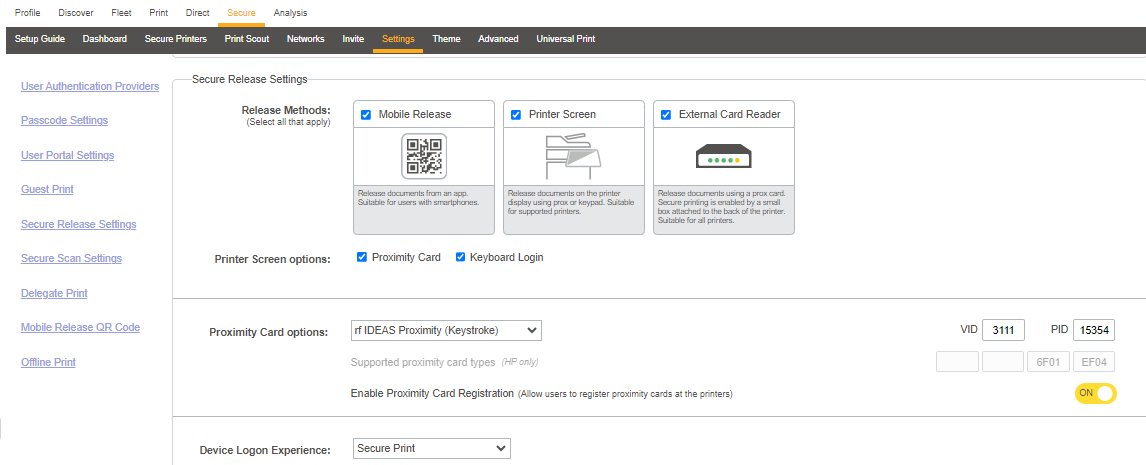
Step 5: Set up Print Release Option
Navigate to the Secure > Settings screen to configure how users release their documents from a secure printer. For Secure Release Cloud Connector, the options are:
- Printer Screen release. Using this option, users release documents from a secured cloud-connected printer using their access badge (proximity card) or keyboard login.
- Mobile Release. Using this option, users release documents from a secured cloud-connected printer using the Secure Release mobile app on their mobile devices.
Step 6: Secure Printers using the Device Discovery and Deployment Utility (DDU)
The Device Discovery and Deployment Utility is a stand-alone utility that scans the network for devices that can be secured with the Cloud Site Service. It is also used to secure, resecure, and unsecure supported printers with the Cloud Site Service.
To use the DDU to secure printers:
- Optional: Configure IP ranges for the device you want to configure either on the web portal or on the DDU.
- Download the DDU from the Secure > Setup Guide tab of the web portal.
- Run the DDU on any machine with a line of sight to the printers you wish to discover.
- Initiate the Device Scan.
- Launch the web portal and start securing your printers.
For more informatin on how to use the Device Discovery and Deployment Utility (DDU), refer to the Device Discovery and Deployment Utility document.
Step 7: Getting Users Started
After configuring the Secure Release Cloud Connector, users can start printing their jobs. The following section shows a user’s experience when they use Secure Release for the first time.
First time use of Secure Release Cloud Connector
Linux (Only available for sites with OpenID authentication)
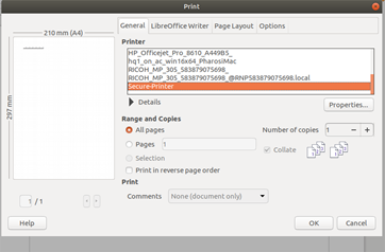
- Submit your documents to the default Secure-Printer queue. You can select a range of finishing options.
-
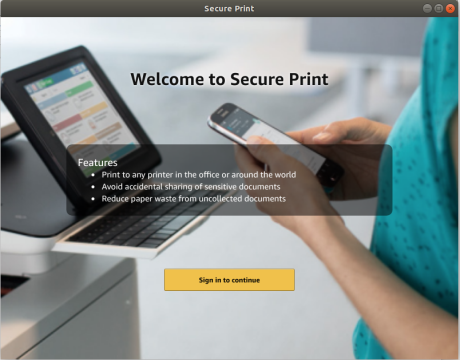
On the screen that appears, click Sign in to continue.
-
Sign in with your company email address and password. When successfully authenticated, the following screen appears.
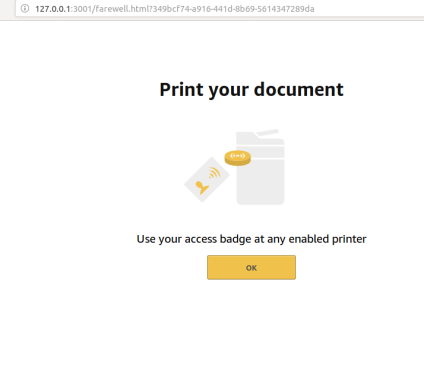
- Walk up to any printer and then swipe your proximity card (access badge).
-
The home screen shows the number of queued documents waiting for release.
- Either click Print all, or optionally review your documents.
- Collect your documents.
Windows
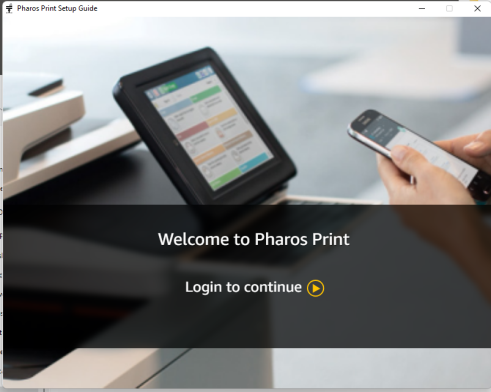
- Open the Pharos Print desktop app.
- Click Login to continue. Sign in with your company email address and password.
- When successfully authenticated, you'll see the Authenticated successfully message.
- Using the Pharos Print desktop app, register your mobile device or proximity card.
- Walk up to any printer and then swipe your proximity card (access badge).
- The home screen shows the number of queued documents waiting for release.
- Either click Print All, or optionally review your documents
- Collect your documents.
Mac
When in Cloud Connector mode (i. e. Cloud Site Service is enabled), the Mac Print Scout creates a Cloud IPP-based queue. In other circumstances, it will create an IPP queue using Apple's local AirPrint, unless you want to generate a custom package and use a different manufacturer's driver fto create secure queues.
1. Print your documents to the default Pharos Secure Printer queue.
2. On the screen that appears, click Login to continue.
3. Sign in with your company email address and password.
4. Select a release method.
5. Walk up to any printer and then swipe your proximity card (access badge).
6. The home screen shows the number of queued documents waiting for release.
7. Either click Print all, or optionally review your documents.
8. Collect your documents.