Device Discovery and Deployment Utility
The Device Discovery and Deployment Utility (DDU) is a stand-alone utility that allows IT admins to perform the following tasks.
- Scan the network for printers that can be secured with Secure Release Cloud Connector.
- Secure, resecure, and unsecure printers with Secure Release Cloud Connector.
- Scan the network for Ethernet 241 devices and secure printers with Ethernet 241 for Secure Release.
Note: Securing devices for Ethernet 241 is performed through the DDU instead of the typical method of securing printers via the Secure Printers dialog in the web console For information on how to configure Ethernet 241, refer to the Ethernet 241 Deployment Guide.
The DDU also includes advanced options that allow you to modify the network ranges that are used with the device scan and to configure SNMP.
The DDU replaces the command-line tool (MFP Deployment Tool) that was used to operate on cloud-enabled devices. Using the Secure Printers dialog in the web portal, the DDU allows you to operate on cloud-enabled devices in the same way you operate on on-premises devices.
Note: Unlike the Device Scout, the information provided from a DDU discovery is static. There is no periodic gathering of device information like there is with the Device Scout.
Downloading the Device Discovery and Deployment Utility
Before downloading the DDU, you'll need to check the following:
- You have the Site Encryption Key.
- (Optional) Configure the IP ranges for the devices you wish to discover. If no IP address range is provided, the DDU will automatically detect the subnet that the DDU is running on and scans that.
Note: You can only see the Download Device Discovery and Deployment Utility in the Setup Guide if your site is setup with Cloud Connectors (i.e. Cloud Site Service).
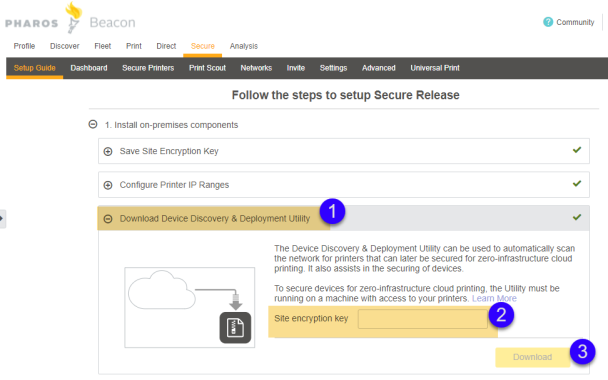
To download the Device Discovery and Deployment Utility:
1. In the web portal , navigate to the Secure > Setup Guide
2. In the Download Device Discovery and Deployment Utility section, enter the site encryption key.
3. Select the Download button to download the DDU.
Running the DDU
Run the DDU on any workstation that has a line of sight to the printers that you wish to discover.
1. Copy the downloaded DDU zip file and extract the file.
2. A new window opens showing the Setup application files. Run Setup.exe.
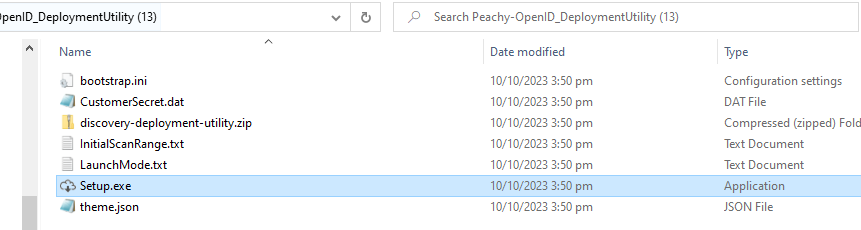
3. Double-click on the discovery-deployment-utility shortcut to open the DDU.

![]()
Initiating the Device Scan
Select the Initiate Device Scan button to scan for devices. The DDU will use the IP information provided in the Network Settings screen of the DDU or the Configure IP Ranges in the Secure > Setup Guide screen in the web portal.
- If no IP address range is provided, the DDU will automatically detect the subnet that the DDU is running on and scan that.
- The IP range(s) defined in the DDU takes precedence over the ones defined in the web portal.
All discovered devices are added to the Fleet and Secure Printers grids of the web portal.
Note: If you change IP ranges in the web portal, you need to relaunch the DDU to to pick up the changes.
Securing a Printer
Selecting the Secure Printers on the DDU directs you to the web portal. If you are already logged in it takes you to your last viewed page. If you are not logged in, the login screen is shown.
Note: Only HP, Ricoh
Note: The DDU must remain open when securing or unsecuring devices. If the utility is not running in the background, you will not be able to secure or unsecure cloud-enabled devices from the web console.
- Run the DDU if it is not already running.
- In the web console, navigate to the Secure > Secure Printers screen.
- Select the check box for each printer you want to secure.
- Select the Secure Printers button. This opens the Secure Printers dialog box.
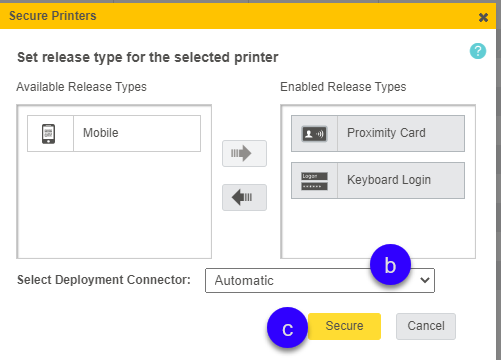
- In the Available Release Type(s) list, select the desired release method using the right arrow button. To remove release types, select them from the Enabled Release Types and use the left arrow button to move them back to the Available Release Types list.
In the Select Deployment Connector, the default option is Automatic. You can choose whether to secure the printer using the Device Scout (Local Connector) or the Device Discovery and Deployment Utility (Cloud Connector).
Note: If Automatic is selected and there are both local device scouts and cloud connectors, a local device scout will be used. If you have cloud enabled devices and you wish to use the DDU (cloud connector) to secure the device, you will need to select the Cloud Connector.
Click the Secure button and then click OK to complete the process.
-
The Status of the selected printer(s) will be updated to Secured if one or more release types are enabled.
-
Exit the dialog box.
Unsecuring a Printer
-
Run the DDU if it is not already running.
- In the web portal, navigate to the Secure > Secure Printers screen.
-
Select the printer(s) you want to unsecure.
-
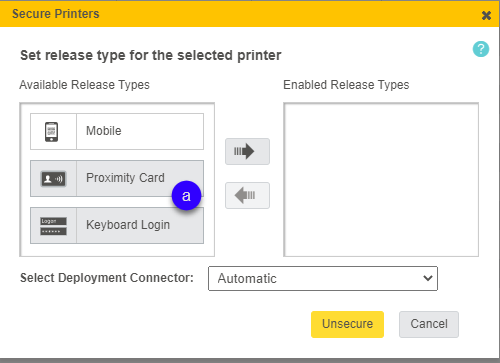
Click Secure Printers. This opens the Secure Printers dialog box.
- Select Proximity Card and Keyboard Login under Enabled Release Types list.
-
Click the left arrow to move the selected release types from the Enabled Release Types list to the Available Release Types list.
- In the Select Deployment Connector field, select the Cloud Connector to unsecure the printer.
- Click Unsecure to complete the process.
-
The Status of the selected printer(s) is updated to Unsecured.
Discovery and Deployment Utility Network Settings
The DDU has advanced options that allow you to modify the network ranges that are used with the device scan and to configure SNMP. Select Network Settings on the DDU interface to access the following tabs:
- Network Ranges
- SNMP Configuration
- Proxy Settings
Network Ranges tab
The initial scan range is taken from what the user entered in the Pharos Print Setup Guide(if anything). The scan range data is initially taken from the InitialScanRange.txt text file in the DDU’s discovery-deployment-utility\App_Data\Configuration folder.
The Network Ranges tabs allows manual entry of the IP ranges of the devices that you want to scan. IP inclusions and exclusions are supported.
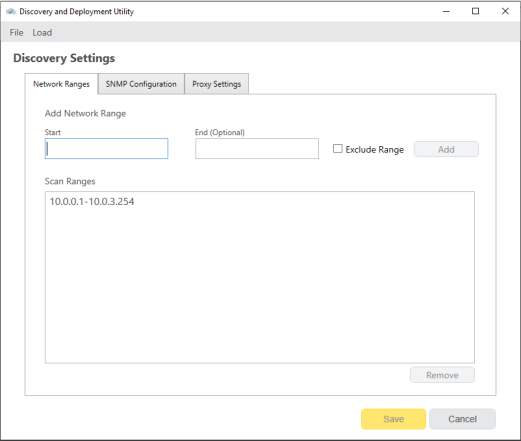
Manual Entry of a Single IP Address
- In the Start text field, enter a single IP Address.
- Click Add to add the IP address or Exclude to exclude the IP address.
Manual Entry of an IP Address Range
- In the Start text field, enter a starting IP Address.
- In the End text field, enter an ending IP Address.
- Click Add to add the IP address range or Exclude to exclude the IP address range.
Delete IP or IP Address Range
To delete an IP address or an IP address range, select the IP or IP range you want to delete and then click the Remove button. Click Save to save the changes.
SNMP Configuration Tab
Select the SNMP Configuration tab to set the port number, create or delete communities and create, edit or delete SNMPv3 configurations. New communities and configurations are added to the top of their respective lists and can be rearranged using drag and drop.
SNMP Communities
In SNMPv1/v2, security is implemented through the use of communities. Pharos Cloud includes a default v1 SNMP configuration called public, which uses the default SNMP Community string “public”.
To add a new SNMP Community:
- In the text field under SNMP Communities, enter the community name that matches the SNMP Community string configured in your devices.
- Click Add.
- Update SNMP Port Number if required. Default port is 161. The firewall must be configured to allow access through this port.
- Click Save.
SNMPv3 Configurations
To add an SNMP v3 Configuration
- Under the SNMPv3 Configurations, enter a name to identify the SNMPv3 configuration
- Click Add. This opens a SNMPv3 Configuration dialog box.
- Enter the SNMP v3 details of the devices.
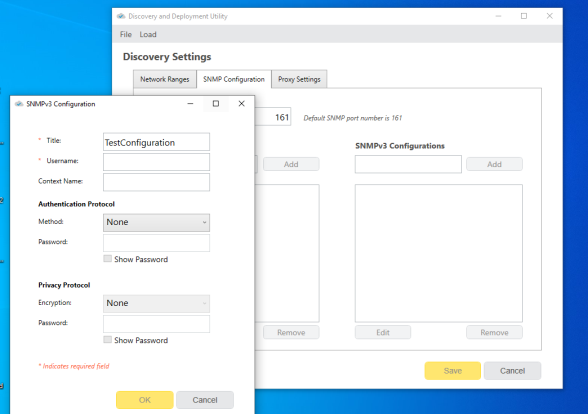
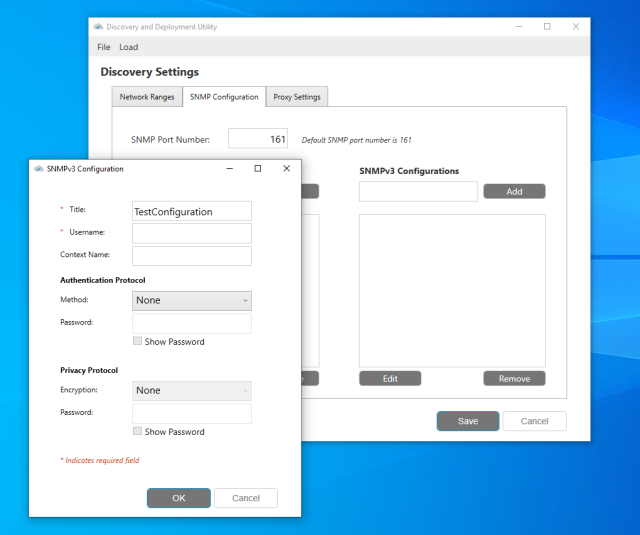
- Title – Enter a name to identify the SNMPv3 configuration.
- Username – Specify the username of the device.
- Context Name – If configured for a device, enter the context name. This string is case-sensitive.
- Authentication Protocol – Select the authentication protocol and enter the password associated with the Authentication protocol. Choose from the following options:
- None
- MD5
- SHA1
Note: MD5 is not compatible with FIPS (Federal Information Processing Standards). If you have FIPS enabled and use MD5 as your authentication protocol for a device, you will get the error "Scan ended with error: This implementation is not part of the Windows Platform FIPS validated cryptographic algorithms".
- Privacy Protocol – Select the privacy protocol and enter the password associated with the privacy protocol. Options to choose from are:
- None
- DES
- AES_128
Note: Both protocols require passwords if the protocol(s) is set to something other than None.
Note: Make sure that all fields exactly match the SNMP v3 settings configured in your network print devices otherwise, the devices may not be discovered.
Note: The Context Name field is required if it is configured for the devices.
4. Click OK to save changes.
5. Click Save.
Proxy Settings Tab
To configure the DDU to use proxy server , select the Proxy Settings tab.
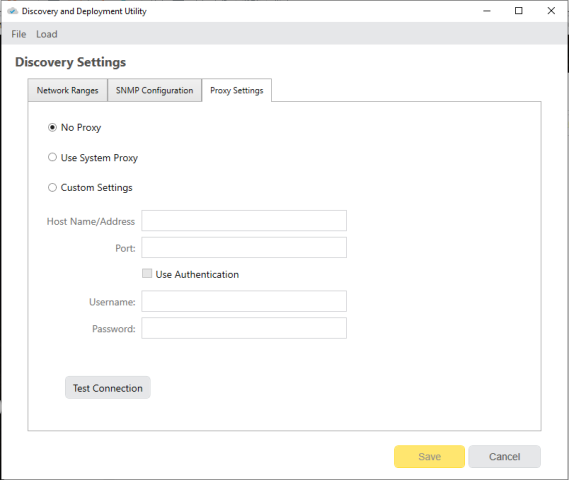
No Proxy Use this option if you don't want to use a proxy server. This is the default setting.
Use System Proxy Use this option if you want to use the proxy settings from the local machine's configuration.
Custom Settings Use this option to manually set proxy settings for your site.
To manually set proxy settings, follow these steps.
- In the Hostname/Address field, enter a valid proxy server address.
- In the Port field, enter the port used by the proxy server.
- If required, select Use Authentication and then enter the Username and Password to authenticate on the proxy server.
- Click the Test Connection button to check if you can connect to the proxy server.
- Click Save. You'll get a prompt to restart the DDU to update the proxy settings.
- Restart the DDU by closing and reopening the DDU user interface.
File Options
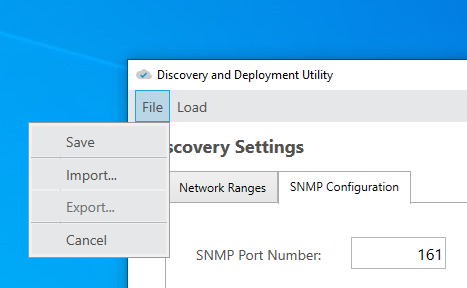
- File > Save and File > Cancel behave as the Save and Cancel buttons. Both Save and Cancel operate on any changes made to both the Network Ranges and SNMP Configuration tabs.
- File > Import: Allows users to import text or JSON file containing IP and SNMP data.
- File > Export: Exports IP and SNMP data to a JSON file that the user specifies.
Load
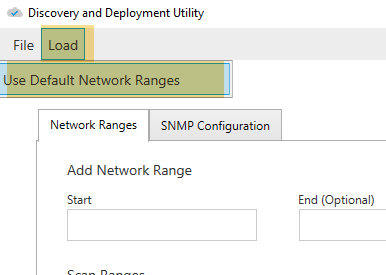
Load > Use Default Network Ranges: When you select Use Default Network Ranages, the DDU will scan the local subnet only based on the IP address and subnet mask of the server on which the DDU is running
Troubleshooting the DDU
Log Files
The primary means of diagnosing issues in DDU is through logging. By default, DDU logging is configured to always log to a file. This guarantees that if a customer reports a problem, then there are log files available to help diagnose the issue.
Log records are saved in the log.txt file found in the discovery-deployment-utility directory.
Unable to install app error messages when securing a printer using the DDU
Error: Unable to install app: The system was unable to install the app on <printer name> at <printer IP address>. Please try again or check the log file for more information.
Resolution: Only HP, Ricoh and Konica Minolta printers can be secured using the DDU. This error indicates that you may be securing an unsupported manufacturer. Check the log file log.txt and you'll see an error similar to this one. Use the Device Scout (Local Connector) to secure an unsupported printer for Secure Release.
2021-05-27 14:27:56.513 +12:00 [ERR] MfpDeployment.Install: Exception caught - install request failed discovery_deployment_utility.Exceptions.UnsupportedDeviceTypeException: <Printer manufacturer> device types are currently not supported.
The Proximity Card and Keyboard Login are not in the Available Release Types when securing a printer using DDU
- Check that the DDU is running. The Proximity Card and Keyboard Login options are available only when the DDU is running (or a local Device Scout is running).

- In the Secure > Settings > Secure Print Settings screen, verify that the Printer Screen is selected.