Advanced Screen
Cloud Connector Logs
Note: This screen is only available to customers using Secure Print Cloud Connector.
In the Advanced screen, you can download Cloud Connector logs (in CSV format) to help troubleshoot issues (e.g. card swipe error) related to secure printers.
To download logs:
- Specify a date range for the log.
- Select the Export button to download the log file. A CSV file called
cloud_connector_logis downloaded.
Integration APIs
On the Secure > Advanced screen, you can connect to an API endpoint to help you integrate Secure Release into your print environment.
Note: Access to the data is secure and requires authentication per request made.
To use the APIs:
- Turn on Enable Integration APIs to connect to the API endpoint. This creates an Authorization Key, which will give you access to the API.
- Select an API to open the dialog box that shows the information on how to use the selected API. Refer to the examples below.
Note: The following examples use the curl utility command line. Use single quotes for Mac or Linux, and double quotes for Windows for your curl commands.
Note: Enter the file path of your CSV file. Take note of the required fields.
Note: When working with PowerShell for HTTP requests , to use PowerShell 7 or later.
Secure Release User Import API
The User Import API allows IT administrators to programmatically import a batch of users and their associated information.
For sites with Active Directory Authentication Provider
Note: Each line in the CSV file includes the following comma-separated fields: Username, Domain, CardID, LastName, and FirstName. The required fields are Username, Domain, and CardID.
curl -X POST 'https://api.beacon.pharos.com/ext-import-api/active-directory-users/import' -H 'Authorization: bearer <Authorization Key>' -H 'Content-Type: multipart/form-data' -F 'UsernameColumnName=Username' -F 'DomainColumnName=Domain' -F 'CardColumnName=Card' -F 'FirstNameColumnName=FirstName' -F 'LastNameColumnName=LastName' -F 'DataPrivacyRegionColumnName=DataPrivacyRegion' -F 'File=@<CSV File Path>;type=application/vnd.ms-excel'
Example
curl -X POST 'https://api.beacon.pharos.com/ext-import-api/active-directory-users/import' -H "Authorization: bearer ee8a77fa8007d9a66ed457dd68802054f965c7198e1458787ddbde1eb6a01fc4" -H "Content-Type: multipart/form-data" -F "UsernameColumnName=Username" -F "DomainColumnName=Domain" -F "CardColumnName=Card" -F "FirstNameColumnName=FirstName" -F "LastNameColumnName=LastName" -F "DataPrivacyRegionColumnName=US-W-2" -F 'File=@D:\email.csv;type=application/vnd.ms-excel'
For sites with OpendID or Email Authentication Provider
Note: For card Each line in the CSV file includes the following comma-separated fields: EmailAddress, CardID, FirstName, and LastName . EmailAddress and CardID are required fields. Firstname and Lastname are optional fields.
curl -X POST 'https://api.beacon.pharos.com/ext-import-api/users/import' -H 'Authorization: bearer <Authorization Key>' -H 'Content-Type: multipart/form-data' -F 'EmailColumnName=Email' -F 'CardColumnName=Card' -F 'FirstNameColumnName=FirstName' -F 'LastNameColumnName=LastName' -F 'UserGroupsColumnName=UserGroups' -F 'DataPrivacyRegionColumnName=DataPrivacyRegion' -F 'File=@<CSV File Path>;type=application/vnd.ms-excel'
Secure Release User Removal API
The User Removal API allows IT administrators to programmatically remove a batch of registered users via a CSV file. It also removes their associated registrations.
For sites with Active Directory Authentication Provider
Note: Your CSV file must include Username and Domain fields.
curl -X POST 'https://api.beacon.pharos.com/ext-import-api/active-directory-users/remove' -H 'Authorization: bearer <Authorization Key>' -H 'Content-Type: multipart/form-data' -F 'UsernameColumnName=Username' -F 'DomainColumnName=Domain' -F 'File=@<CSV File Path>;type=application/vnd.ms-excel'
For sites with OpendID or Email Authentication Provider
Note: Your CSV file must include the EmailAddress field.
curl -X POST 'https://api.beacon.pharos.com/ext-import-api/users/remove' -H 'Authorization: bearer <Authorization Key>' -H 'Content-Type: multipart/form-data' -F 'EmailColumnName=Email' -F 'File=@<CSV File Path>;type=application/vnd.ms-excel'
Example
curl -X POST 'https://api.beacon.pharos.com/ext-import-api/users/remove' -H 'Authorization: bearer e18faf46db38140024fffe77f3eba466927f0ee3sdfwqt2f1caa5a68f634d17181d8534' -H 'Content-Type: multipart/form-data' -F 'EmailColumnName=Email' -F 'File=@C:\temp\removeuser240731.csv;type=application/vnd.ms-excel'
Secure Release User Registration Removal
The User Registration Removal API allows IT administrators to programmatically remove a batch of print users' login registrations (PIN, Proximity Card or Mobile Registration) via a CSV file. This removes either PIN, proximity badge registrations or mobile registration, but keeping the actual user.
For sites with Active Directory Authentication Provider
Note: The CSV file requires Username, Domain, and Logins fields as shown in the example below. Logins values are as follows 1=PIN, 2= Proximity Badge, 3= PIN and Proximity Badge, 4=Mobile, 5= Mobile and PIN, 6=Mobile and Card, and 7=Mobile, Card, and PIN.
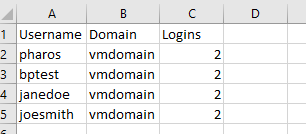
curl -X POST 'https://api.beacon.pharos.com/ext-import-api/active-directory-users/remove-logins' -H 'Authorization: bearer <Authorization Key>' -H 'Content-Type: multipart/form-data' -F 'UsernameColumnName=Username' -F 'DomainColumnName=Domain' -F 'LoginsColumnName=Logins' -F 'File=@<CSV File Path>;type=application/vnd.ms-excel'
For sites with OpendID or Email Authentication Provider
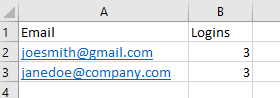
Note: The CSV file requires Logins and Email fields. Logins values are as follows 1=PIN, 2= Proximity Badge, 3= PIN and Proximity Badge, 4=Mobile, 5= Mobile and PIN, 6=Mobile and Card, and 7=Mobile, Card, and PIN.
curl -X POST 'https://api.beacon.pharos.com/ext-import-api/users/remove-logins' -H 'Authorization: bearer <Authorization Key>' -H 'Content-Type: multipart/form-data' -F 'EmailColumnName=Email' -F 'LoginsColumnName=Logins' -F 'File=@<CSV File Path>;type=application/vnd.ms-excel'
Checking the status of the import
The time it takes to complete an import using an API varies, depending on how busy the import service is. After an import, you will see a message similar to the following image. It shows that the import file was submitted, it provides the job GUID, and shows that the job is in a pending state.

You can check the status of an import by copying the importGuid and then running this curl command:
curl -H 'Authorization: bearer <Authorization Key>' https://api.beacon.pharos.com/ext-import-api/imports/<ImportGuid>/information
User Registration
Import registered printer users and their associated information
Use the Import function to import users and their associated information into Pharos Cloud. You can import the following user information into Pharos Cloud.
- Proximity cards - Administrators can batch import and register cards via CSV file upload so new employees and first-time users of the system do not have to go through the card registration process. First-time print users can release jobs with their cards without any extra steps.
- User Groups - For use with Policy Print and Direct Printer Restriction by group.
- Data Privacy Region - This column can be left blank in most cases. Only add a value when you want a user to have a different Data Privacy Region other than the default region set in the web console, for example when using Chrome extension.
Follow these guidelines for a successful import:
- You must include headers in the CSV file. If a header is not included, the first line of data will be treated as the header and ignored. A sample CSV file is also available for download.
- If a user has more than one card ID, you can duplicate the email address as highlighted in the image below.

Note: The CardID value is unhashed in the import file but will be SHA256 hashed by the server.
-
Use the Region Code (e.g. AF-S-1, EU-N-1) for the Data Privacy Region column.
Importing users for OpenID Connect and Email Authentication
For OpenID Connect or Email Authentication, you’ll need to import a comma-separated values (CSV file) containing users user information into Pharos Cloud.
Each line in the CSV file includes the following comma-separated fields: EmailAddress, CardID, FirstName, LastName, UserGroups, and DataPrivacyRegion as shown in the example below.
Note: The email addresses in the CSV file must match the email addresses associated with the user accounts in the OpenID authentication provider.
- For user card import, Email and CardId are required fields.

-
For Policy Print and Direct Print restriction by group, Email and UserGroups are required fields.

- Data Privacy Region is not a mandatory field. Use it when you want to set up a different region (other than the default) for a user.
Importing users’ cards for Active Directory Authentication
For Internal (Active Directory Authentication), each line in the CSV file must include the following comma-separated fields: UserName, Domain, CardID, Email, FirstName, LastName, and DataPrivacyRegion.
For user card import, Email and CardId are required fields.

Note: For sites with Active Directory authentication, the Print Scout automatically populate user groups into Pharos Cloud.
How to import users and their associated information
- Prepare a CSV file following the guidelines above or download the sample CSV file.
- Navigate to the Secure > Advanced screen and then go to User Registration section.
- Click the Import button and then select the CSV file to import.
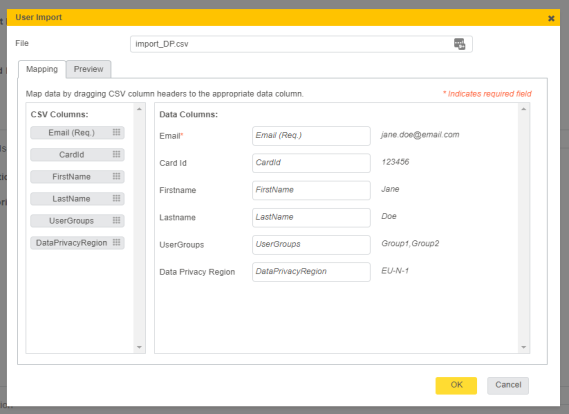
- Map data by dragging CSV column headers to the appropriate data column. The mapping view shows the CSV fields in the left column, called CSV columns. The fields in Secure Print appear in the right column, called Data Columns.
5. Click the Preview tab to see up to the first 50 rows of CSV data and verify that the mappings are correct.
6. Click OK. A window displays the results of the import, the number of rows processed, and any errors during the import process.
Remove User Registration
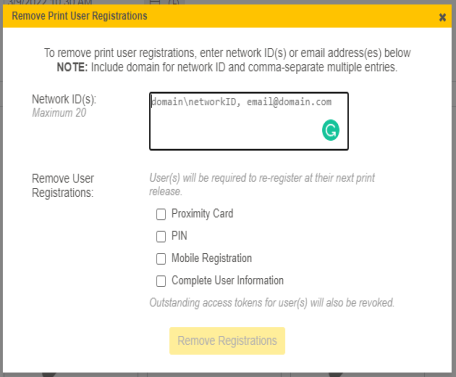
The Remove Registrations button allows you to remove registered print users and their associated proximity card and/or PIN registrations. You will need to enter the network ID of the user or users whose registration details you want to remove. The options are:
- Proximity Card - This removes the association of a card ID from a user. For example, when a user leaves the company, this allows the same card to be used by another user. Or if a user lost their card, old card registration can be removed for security purposes.
- PIN / Passcode - This option removes the associated PIN or Passcode for a registered user so the user can change their PIN number or Passcode, for example.
- Mobile Registration - This option removes mobile registrations of users if you have any security concerns (e.g., refresh token is compromised).
- Complete User Information - This option removes registered print users as well as their associated proximity card and PIN number.
Remove the user group or the Data Privacy region assigned to a user
IT administrators can remove group assignments via a CSV import file. To remove a group or a Data Privacy region assigned to a user, you’ll need to add a dash/hyphen in the CSV file (in place of the group name or Data Privacy Region) and then import the file (using the Import button in the Secure > Advanced tab). This removes the group details or Data Privacy region assigned to a user.
Examples:


User and Group Sync
Pharos Cloud supports the automatic provisioning of users and groups from identity providers using the System for Cross-domain Identity Management (SCIM) protocol. SCIM is an open standard automating user provisioning for organizations by communicating employee identity data from identity providers (IdP) to service providers.
Pharos Cloud supports the following identity providers:
The User and Group Sync section is used to import users and groups from an identity provider that supports SCIM 2.0.
The Generate Token is used to generate the SCIM credentials for use in your chosen identity provider. Download the generate Tenant URL and Token values. You will need these later when configuring the SCIM application in your identity provider.
Last Access shows the date and time when an action (e.g. update users or groups) occurs on the identity provider. A warning appears if Pharos Cloud has not received any update for over 60 days.
Token Expiry shows when the generated token expires. You will get a warning message when the token is about to expire(2 weeks before expiry) or has expired.
Note: It is highly recommended to download a copy of the credentials using the Download button (instead of the Copy button). If you accidentally open a new tab, a new token will be generated and this may result in a mismatch.
- SCIM support is available only upon request.
- The Generate Token button changes to Regenerate Token if a token was already generated.
- The Token is valid for a year. If a token is about to expire or has expired, you will see an appropriate message in the Pharos Cloud web console. You will need to regenerate a token and update the token in your identity provider.
- Once a connection with SCIM is established, we do not recommend using the import function to import users into Pharos Cloud. You can however use import to add cards for the users.
Note: The User and Group Sync section is available in the Secure > Advanced screen or Direct > Direct Print Settings screen (for customers with Direct Print only license).