Getting Started With Policy Print
Prerequisites
To get started with Policy Print, you will need the following:
- License for any of the following products:
- Print Analytics
- Secure Release
- Direct Print
Note: Policy Print is supported on all types of queues. It is not supported with Print Scout in "server mode".
- Ask the Operations team to enable Policy Print for your organization.
Step 1: Enable Policy Print in the Pharos Cloud Web Console
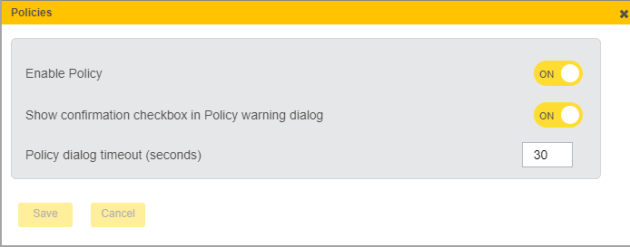
Navigate to the Profile > Policy tab and click the Configure button. Toggle the Enable Policy switch.
Step 2: Create a Policy
With Policy Print enabled, you can now start creating policies.
1. In the Profile > Policy tab, select the Create button.
2. In the Policy Name field, add a name for your policy
3. In the Description field, enter a meaningful description for your policy.
4. In the Groups section, assign a group to which the policy will apply.
Notes:
- Groups may not be available for selection because they have not been imported or they have not been populated by the Print Scout. You can skip this part for now and add groups later.
- For sites with Email Auth and OpenID authentication, you will need to import groups into the Pharos Cloud system. See Step 3: Add Groups section of this document.
- For sites with Active Directory authentication, the Print Scout automatically populate user groups into Pharos Cloud. See Step 3: Add Groups section of this document.
5. In the Rules section, click Insert new rule. Add an action, at least one condition, and a prompt for each rule.
- In the drop-down menu, select the action to apply to users when the rule is triggered. The options are Warn or Deny
| Action | Description |
|---|---|
| Deny |
A Deny action prevents print jobs from occurring. If a Deny rule triggers, employees are presented with a pop-up dialog informing them that their action is against company policy and that their job has been cancelled. |
| Warn |
A Warn action allows print jobs to proceed after confirmation from the employee. If a Warn rule triggers, the employee is presented with a pop-up dialog showing that the activity is against company policy. The employee can either choose to cancel the job or to continue printing. |
b. Select the triggers that you want to apply to the rule. The following triggers are available:
| Trigger Condition | Description |
|---|---|
| Document contains color | The rule triggers if a document contains color. |
| Document exceeds page (x) | The rule triggers if the total number of pages is greater than the defined number of pages. |
| Single-sided printing | The rule triggers if the document is single-sided. |
| Printing to a local printer | The rule triggers if the device is connected directly (e.g., via USB) to the employee’s workstation. |
| Document contains the word | Use certain keywords as a trigger the rule. |
Notes:
- A rule can have more than one trigger condition. For example, you can set up a policy to deny printing if document contains color and document is single-sided.
- Trigger conditions work using an AND function, meaning the trigger will only fire if all the trigger conditions are true.
- There can be multiple rules within a policy. If a job triggers multiple rules with different actions, the rules with the most restrictive action are applied. In order of decreasing restrictiveness, the actions are Deny is greater than Warn. For example, if two Deny rules and one Warn rule are triggered, then the prompts for both Deny rules are displayed on the Policy Notification dialog. The Warn rule prompt will not be displayed.
c. In the Prompt field, a default pop-up message is applied. You can remove the default prompt and add your own message if you wish.
6. Save the policy.
Note: The priority will be based in the order of creation of the policy. You can change the policy priority later.
Step 3: Add Groups
Import Groups (for sites with Email Auth and OpenID authentication)
If your authentication provider is either Email Authentication or OpenID Connect, you will need to import groups into Secure Release. Import comma-separated values (CSV file) containing users' email addresses and groups into Secure Release.
Note: For OpenID, the email addresses in the CSV file must match the email addresses associated with the user accounts in the OpenID authentication provider.
To import groups for use with Policy Print:
1. Navigate to the Secure > Advanced tab (for sites with Secure Print license) or Direct > Settings screen for sites with Direct Print license only.
2. Download the CSV sample file. Email and UserGroups are mandatory fields.
3. Click the Import button and then select the CSV file to import.
4. Map data by dragging CSV column headers to the appropriate data column. The mapping view shows the CSV fields in the left column, called CSV columns. The fields in Secure Release appear in the right column, called Data Columns.

5. Click the Preview tab to see up to the first 50 rows of CSV data and verify that the mappings are correct.
6. Click OK. A window displays the results of the import, the number of rows processed, and any errors during the import process.
Populating Groups for Active Directory Authentication
With Active Directory Authentication, you do not need to import groups into the Pharos Cloud system just as you do with Email Auth and OpenID auth. The Print Scout component automatically uploads user groups (both Global and Universal groups) into the web console. This applies for the following customer configurations:
- Print Analytics
- Secure Release license with Active Directory authentication
- Direct Print with Active Directory authentication
Initially, uploading groups to Pharos Cloud is triggered by a user's first print job. After Policy Print is enabled, the first time an employee prints a document from their workstation, the Print Scout sends the user's group information onto Pharos Cloud. After the first group upload, the Print Scout will sync user groups with the Active Directory daily and if a change is detected, it will re-upload the updated list to the Pharos Cloud server (e.g., a new user group is added).
Note: If for some reason the user group upload does not occur during the user’s first print, the upload will occur in the next scheduled upload which typically happens the following day.
Step 4: Assigning a Group to the Policy
The following steps assume that you have already created a policy as well as imported a group (for Email Auth and OpenID) or a user has sent their first print job (for Active Directory Auth).
1. Select the policy that you want to assign a group to.
2. Click the Edit button.
3. In the Groups field, type part of the Group name. The search returns the group’s display name.
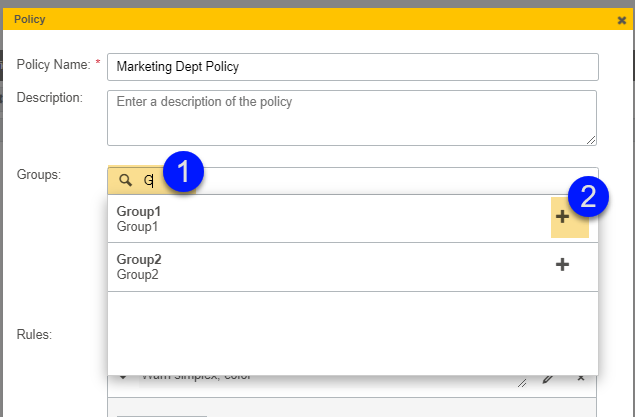
4. Click the + sign to assign the group to the policy. The group now appears in the policy’s list of groups.
5. Click Save.
Step 5: Update or Install Print Scout on user workstations
The Workstation Print Scout handles checking and applying policies. You’ll need to install or update existing Print Scouts on user workstations with Policy Print functionality.
Step 6: Print a test job
1. On the workstation where you have installed Print Scout, register user to Secure Release if you haven’t already done so.
- OpenID Authentication: Register to Secure Release so the Print Scout can obtain your email address.
- Email Authentication: Register email address to Secure Release.
Note: User registration is not needed for sites with Active Directory authentication.
2. Send a print job (to the Pharos Secure Printer) that will trigger a rule in the policy.
Related Topics: