User Authentication Providers
Every print user must first register to Secure Release before they can print documents. Registration is required to establish the identity of users who submitted a print job. The Print Scout component is responsible for facilitating user registration.
Secure Release supports the following authentication providers for user registration.
- Email Authentication – Uses a familiar email-based account verification workflow. This is the default option.
- Active Directory – This option is suitable for organizations that use Windows Active Directory (AD) for managing users. The Print Scout uses the user’s workstation ID to establish the identity of the user. This option does not require user registration, which means users can submit and release print jobs at once.
- OpenID Connect – This option uses token-based OpenID Connect technology to verify print user identity. This option is suitable for organizations with an existing supported OpenID Connect Identity Provider (e.g., Azure AD, Google) and has well-governed and well-known badges for user access and identity.
- SAML (Securiy Assertion Markup Language) - This option uses the SAML protocol to authenticate the identity of print users. It is ideal for organizations that already have a SAML configuration in place.
Note: Changing authentication providers will clear all existing user registrations, meaning all existing users will need to register again. You'll also need the Site Encryption Key to switch authentication providers.
Email Authentication
With email-based authentication, users register with Pharos Secure Release by providing an email address. Secure Release then sends an email containing a unique link and verification code to the email address provided, allowing the user to validate ownership of the email account and complete their registration.
Users register their proximity card at a printer using their email address and PIN combination. After this initial setup, the user's ID card is all that's required to authenticate at a network device to release documents. If a user’s proximity card is lost, damaged, or forgotten, users can authenticate at a printer using their registered email address and PIN code.
For information on how to register an email address to Secure Release, refer to the Register email address to Pharos Secure Release topic.
Email domain whitelist
The Email domain whitelist section allows you to add email domains that you wish users to be able to register with. Email domains that are not on the list are blocked. Users will see the message "<domain>" is not allowed when registering an email address from a domain that is not on the list. If you leave the list empty, Pharos Secure Release allows users to register from any domain. This is the default behavior.
Adding a domain to the whitelist
In the Email domain whitelist field, enter the domain that you want to whitelist and then click Add. You can add more than one email domain. Click Save for changes to take effect.
Deleting a domain from the whitelist
To delete a domain, select the domain you want to remove and then click the Delete selected button.
Note: If you delete a domain that users are already registered with, existing users will be able to use Secure Release as usual, but new users will only be allowed to register with domains in the whitelist.
Active Directory
This authentication option is suitable for organizations that use Windows Active Directory (AD) for managing users. With this option, users authenticate at secure printers using their network credentials.
If card registration is enabled (under Proximity Card Settings in the Secure > Settings screen), users can walk to any printer, swipe their card and enter their network ID. After this initial setup, a user's ID card is all that's required to authenticate at a printer to release documents.
OpenID Connect
Secure Release supports OpenID Connect for Single Sign-on (SSO). When a user prints a document for the first time, they are redirected to the authentication provider’s (Azure AD, Google, etc.) login page. Users log in to Secure Release using their credentials from the authentication provider configured in the system. Once logged in to their provider, users are automatically logged in to Secure Release.
Note: Secure Release supports the following authentication providers: Microsoft Azure AD, Google and PingFederate.
Prerequisite:
Before you can use OpenID Connect with Secure Release, you must first create and register an application for Secure Release in your OpenID provider. The OpenID provider assigns a unique Client ID/Application ID and Client Secret for the application after a successful registration. Record these values because you need them to configure Secure Release.
Before you Begin
Refer to the following documents to set up OpenID Connect as an authentication provider for Secure Release:
Configuring OpenID Connect
To configure an OpenID Connect authentication provider, follow these steps:
- Navigate to the Secure > Settings tab.
- In the User Authentication Providers section, select OpenID Connect.
- Enter the following details of the Secure Release application as provided by the OpenID authentication provider:
- Well-Known Endpoint
- Client ID
- Client Secret
- Save the changes.
For information on how to authenticate with your OpenID Connect credentials, refer to the Register Secure Release using your OpenID Connect Credentials topic.
SAML
Pharos Secure Release supports the SAML protocol as an authentication provider. When a user prints a document for the first time, they are redirected to the authentication provider’s (e.g., Azure) login page. Users authenticate using their credentials from the configured authentication provider in the system. Once successfully authenticated with the provider, users are automatically logged in to Pharos Secure Release, ensuring a seamless and secure login experience.
Step 1: Create an application in Azure AD
The first step in configuring SAML with Azure AD as an Identity Provider (IdP) is to create an application in Azure Active Directory (Azure AD) that will use SAML for Single Sign-On (SSO).
Start by accessing the Azure portal and navigating to the Enterprise Applications section, where you can configure an application requiring SSO. This step sets up the application for SAML SSO and allows you to gather the necessary metadata and configuration details required for the SSO setup.
Gather the following SAML information from Azure:
-
Microsoft Entra Identifier (Entity ID)
-
Metadata Location (which has the URL or file path wherethe SAML metadata of the identity provider is hosted or restored).
Alternatively, you can download the metadata file and autofill the information onto the web console.
For detailed instructions, refer to the Step 1: Add Pharos Cloudapplication in the Azure portal section in the Configuring Azure Single Sign On(SSO) SAML Protocol document. This section provides step-by-step guidance on setting up and retrieving the necessary SAML configuration details.
Step 2: Configure SAML in the Web Console
Once the application is set up in MS Azure, you can configure SAML for print user authentication. There are two options to configure SAML: dynamic and manual.
Dynamic Configuration
The Dynamic Configuration option requires minimal input - just the Entity ID and the Metadata Location. With this option, Pharos Cloud automatically retrieves the necessary settings from the metadata URL, such as the SSO URL, signing certificate, etc. This option is ideal for environments where the identity provider provides a metadata URL.
|
Setting |
Description |
|---|---|
| Entity ID |
This is the unique URL that identifies your Identity Provider. This is sometimes referred to as the Issuer. In Azure, it is known as Microsoft Entra Identifier. This value typically starts with https://sts.windows.net. |
| Metadata Location |
Metadata Location refers to the URL or file path where the metadata of your identity provider (IdP) is hosted or stored. This metadata contains essential configuration information required for establishing trust and enabling communication between your identity provider and Pharos Cloud. In Azure, it is called App Federation Metadata Url. |
Advanced Options:
Email Field - This is the attribute that Pharos Cloud uses to get the user's email address. System users in Pharos Cloud are created using the email address that corresponds with their SAML email address.
The default value is http://schemas.xmlsoap.org/ws/2005/05/identity/claims/emailaddress.
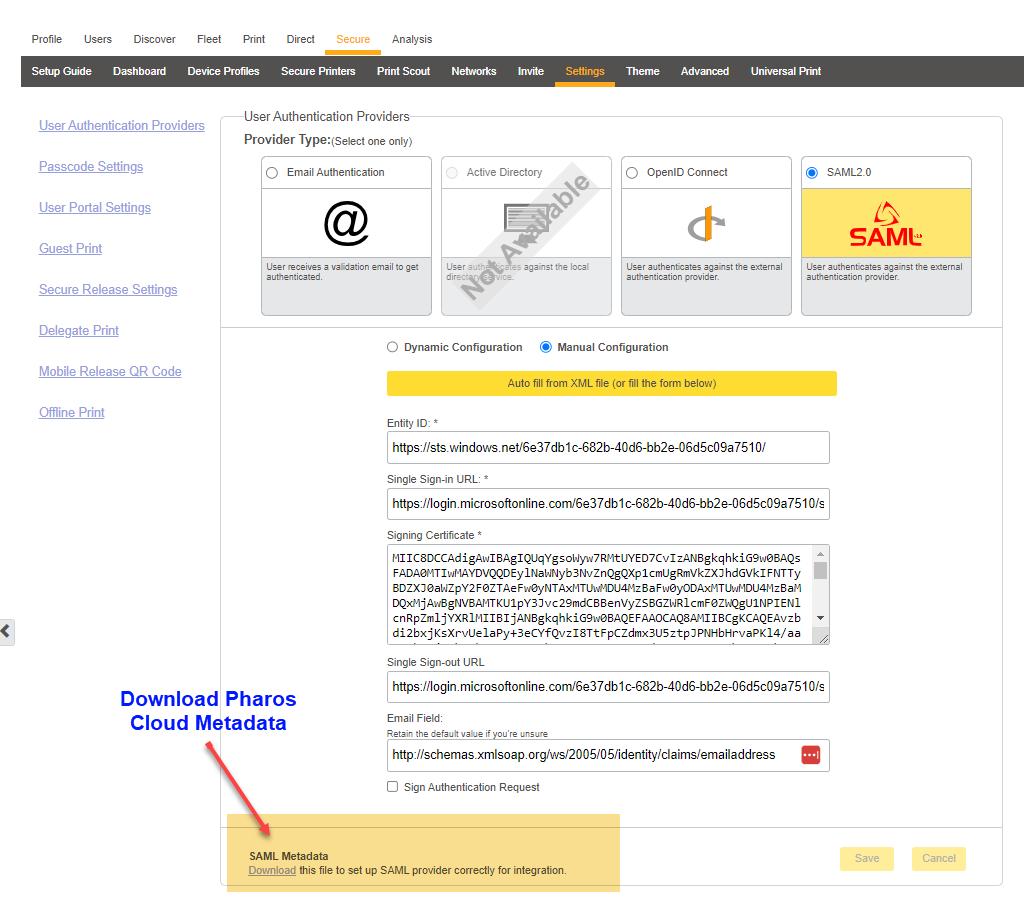
Manual Configuration
The Manual Configuration option enables administrators to either manually enter the SAML configuration details or autofill them using an XML file. This approach is ideal when the metadata URL is unavailable or when specific customizations to the configuration are required.
Auto fill from XML file
To use the Auto Fill from XML File option for SAML configuration, you first need to obtain the metadata file from your identity provider (IdP). This metadata file is an XML document that contains all the critical details required for SAML integration, such as Entity ID, Single Sign-On (SSO) URL,
Single Sign-Out (SLO) URL, etc.
To download the SAML metadata file from Azure, follow these steps
-
Sign in to the Azure portal.
-
Select View under Manage Entra ID (Previously called Azure Active Directory)
-
In the left-hand menu, select Manage > Enterprise Applications.
-
Select the application you've created in the first step.
-
In the application settings, select Single Sign-On from the menu on the left.
-
If SAML is not already configured, select SAML as the sign-on method.
-
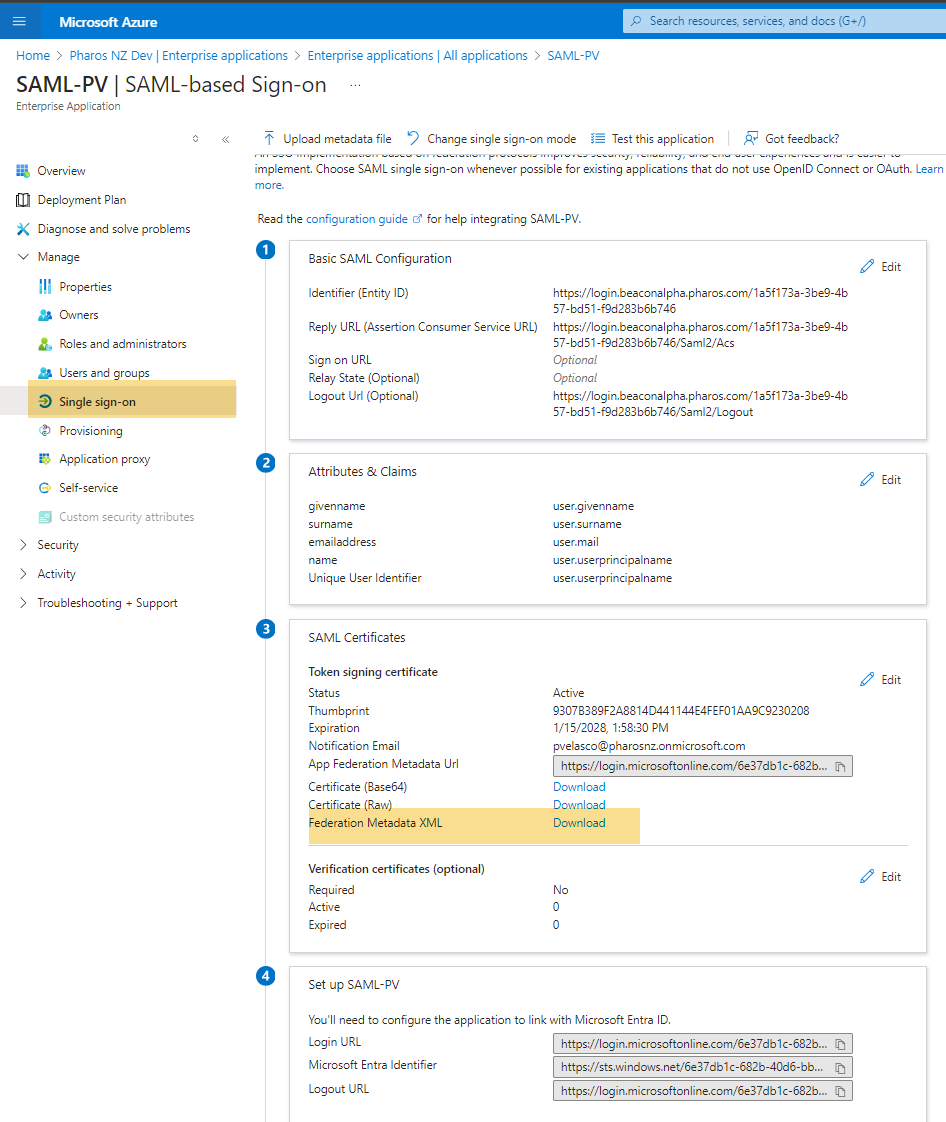
In the SAML Signing Certificate section, look for the Federation Metadata XML link. This is the metadata URL.
-
Download the metadata file by clicking the Federation Metadata XML link. Right-click and choose Save As (or use the browser's download button) to save the metadata file to your local system.
Once you download the metadata file from the IdP, you can upload it into the system by clicking the Auto fill from XML file option. Pharos Cloud will automatically extract and populate the necessary fields in the web console, simplifying the configuration process and minimizing the risk of errors.
Manual Entry of SAML Settings
If you prefer to enter the SAML details manually, the following table provides an explanation of each required setting.
|
Settings |
Description |
|---|---|
| Entity ID |
This is the unique URL that identifies your Identity Provider. This is sometimes referred to as the Issuer. In Azure, it is known as Microsoft Entra Identifier. This value typically starts with https://sts.windows.net. |
| Single Sign-In URL | The URL on your identity provider's server where Pharos Cloud redirects users for signing in. |
| Signing Certificate | The X.509 certificate issued by your identity provider. This certificate is used to validate the signature of the requests from the identity provider to Pharos Cloud. |
| Single Sign-out URL |
(Optional) This is the URL where users are redirected when logging out from Pharos Cloudapplications (e.g. Print Scout, User Portal).
|
| Email Field | This is the attribute that Pharos Cloud uses to get the user's email address. Print users in Pharos Cloud are created using the email address that corresponds with their SAML email address. The default value is http://schemas.xmlsoap.org/ws/2005/05/identity/claims/emailaddress. |
| Sign Authentication Request |
This setting determines whether the initial user sign in request to the identity provider is signed by Pharos Cloud or not. If it's set to No, anyone can initialize authentication request to the identity provider. The default value for this setting is Yes. |
Step 3: Add Pharos Cloud information in the Identity Provider
The identity provider(in this case Azure) requires information from Pharos Cloud to establish transfer of information between Pharos Cloud and the identity provider.
a. Obtain information from metadata in the Pharos Cloud web console
-
Log in to the Pharos Cloud web console and navigate to the Secure > Settings screen.
-
In the SAML authentication provider option, download the setup file from the SAML Metadata section. This file includes most of the Pharos Cloud information required by the identity provider such as certificate, the entity ID, the Assertion Consumer Service URL, etc.
b. Add information from metadata into your identity provider
On your identity provider's configuration panel, enter the required information on your identity provider's configuration interface. With Azure, you can upload the metada file as shown in the image below.

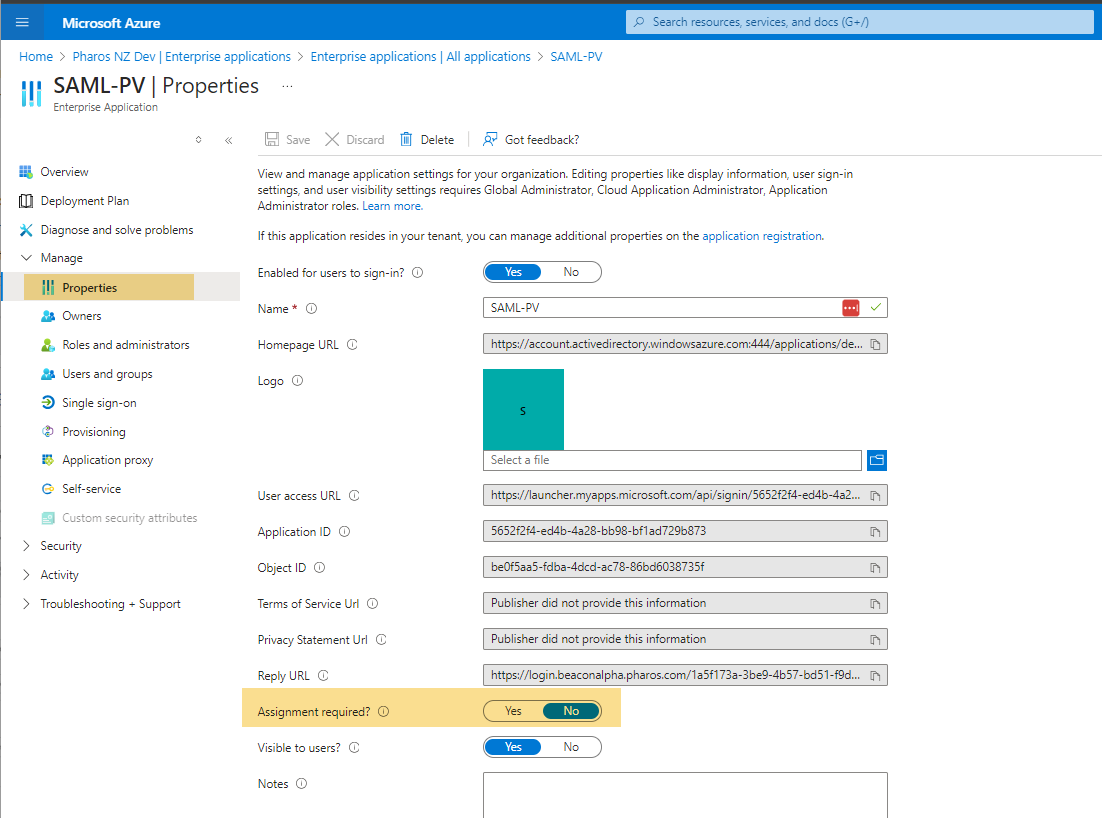
c. Update the Properties
Navigate to the Properties section and ensure that Assignment Required is set to "No". This means users do not need to be individually assigned to access the application. It will be available to all users in the directory without requiring admin assignment.
Step 4: Test User Login
Use any Pharos Cloud application such as the Print Scout or the User Portal and attempt to log in. Verify that end-users can authenticate successfully.
Back to the Secure Release Settings document